Manage Exhibitors / Sponsors
After you have opened exhibitor and / or sponsorship applications for your convention,
attendees are free to apply to exhibit at or sponsor your convention.
This document will walk you through the work flow and system generated emails for the application process. Additionally, various management functions are detailed to assist you in managing exhibitors and sponsors for your convention.
Application
Workflow and Emails
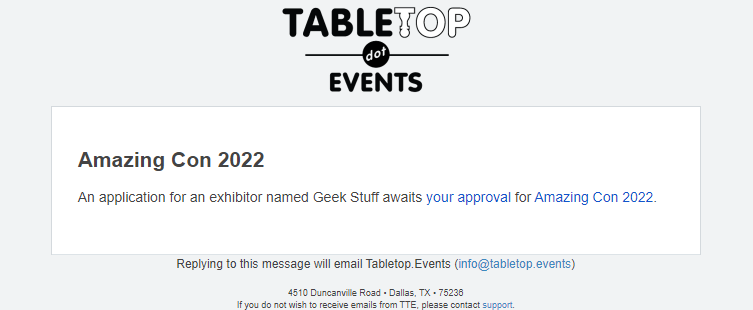
- When an exhibitor / sponsorship application is submitted, the group leader (and anyone with the Exhibitors privilege) will receive a notification email from TTE.
- You may use the link from the email, or you can go to Convention Tools > Exhibitors > Applications.
- This will display the Exhibitor Applications Review screen.
- From this page, you can choose to view Pending, In Review or Unsubmitted applications.
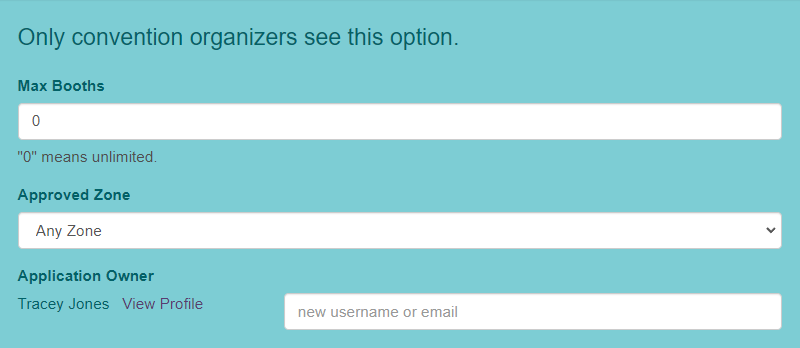
- When reviewing the application, you will see everything submitted by the applicant and will set the Max Booths field to the maximum number of booths this exhibitor is able to purchase. "0" means unlimited. You also see the TTE account who is the Application Owner.
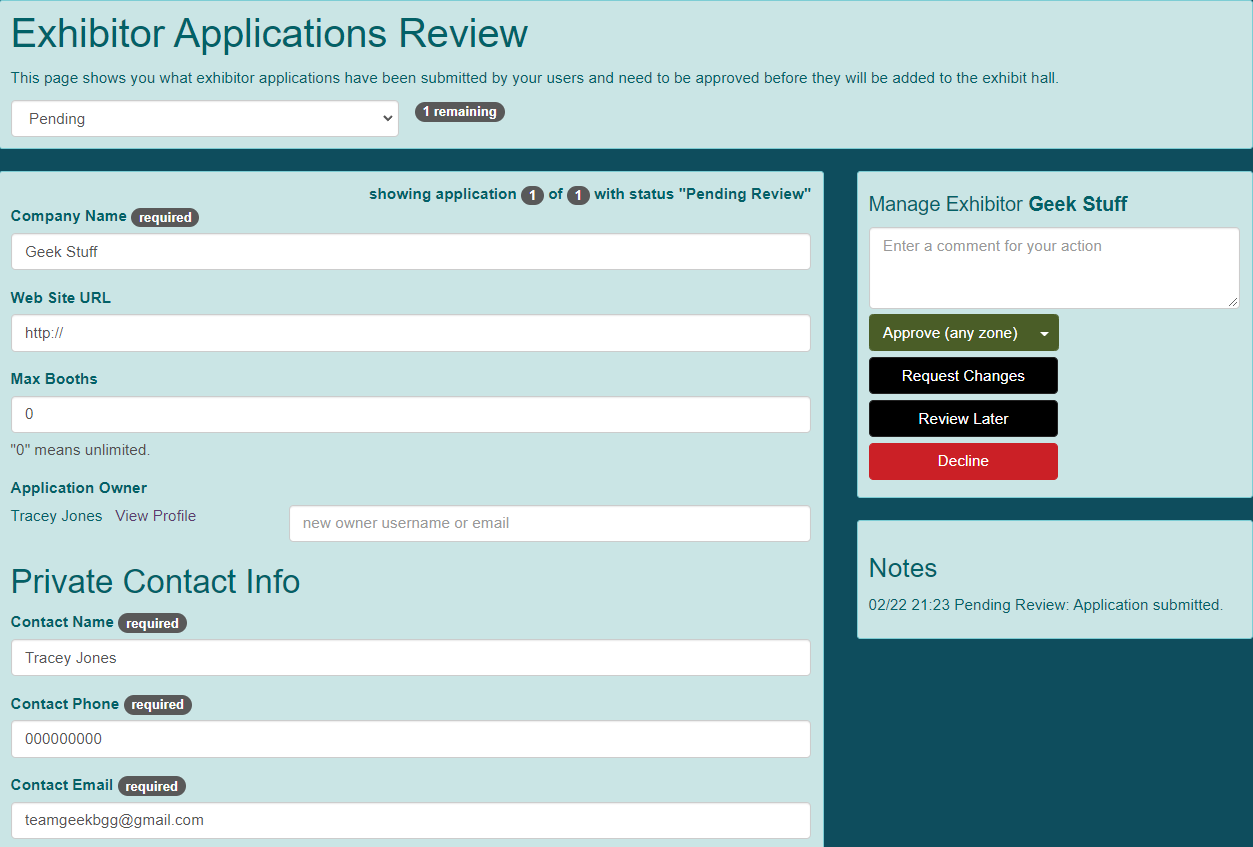
Review Later
- If you want to wait to review the application until a later time, click "Review Later".
- You can always see the application later by selecting the In Review filter.
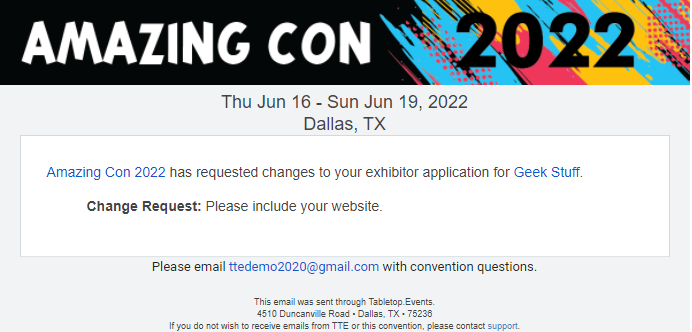
Request Changes
- If changes are required before approving the application, enter a comment in the Manage Exhibitor [exhibitor] section.
- Click "Request Changes".
- An email is sent to the contact.
- When they resubmit the application, you will again receive a notification email.
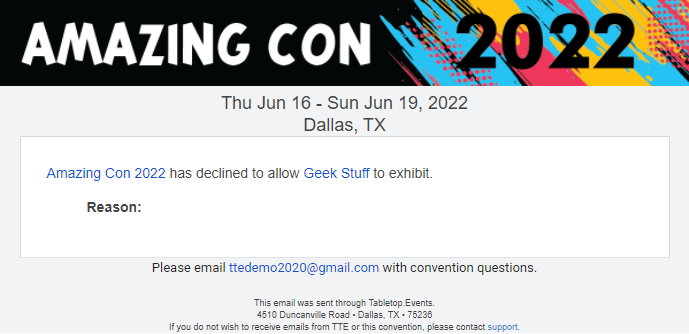
Decline
- If you do not wish to have this applicant exhibit or sponsor your convention, enter a comment in the Manage Exhibitor [exhibitor] section.
- Click "Decline".
- An email is sent to the contact.
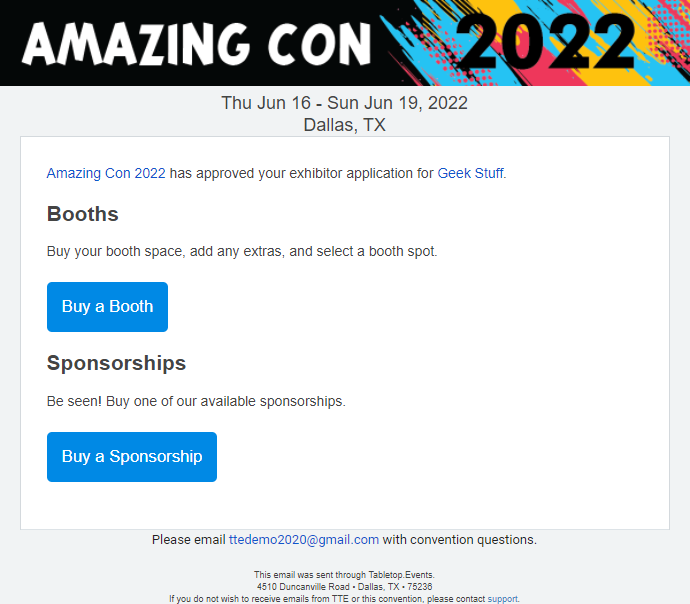
Approve
- When you are ready to approve the application, you can click "Approve". Note: If you are using zones, you can click the arrow next to "Approve" and select the zone to which you are assigning the exhibitor.
- An email is sent to the contact.
- The exhibitor is now listed in the Approved Exhibitors screen.
Edit Application
Applications can be edited after they are created by the applicant. Convention organizers can edit it while it is Pending Review or In Review. Convention Organizers are also allowed to change the Application Owner for the application. This is the TTE account to which the application is assigned. If there is a personnel change at a company or someone wishes to transfer the application from a personal to company account, convention owners may do so.
To change the ownership, type a new owner username or email in the box. Next to the appropriate TTE user in the list of possible matches, click "Choose".
To update the contact information, change the information in the Private Contact Info section.
Exhibitors / Sponsors
Workflow and Emails
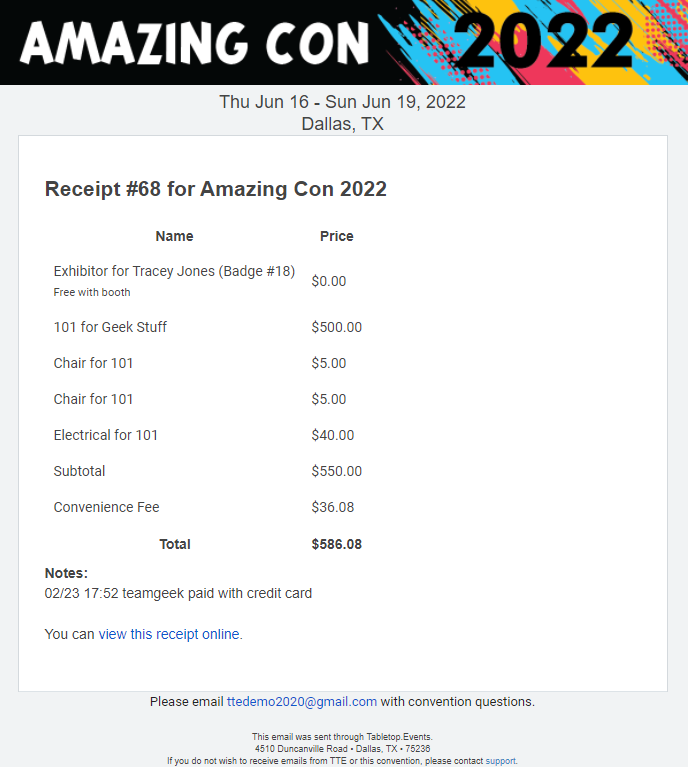
When a booth, booth add-on or sponsorship is purchased, there are multiple emails that may go out depending on the exact situation. Depending on the email, it may be sent to the badge email, exhibitor contact email or the TTE account email.
- Receipt: (From convention to TTE account email) Whoever paid for the booth, booth add-on or sponsorship will get a receipt email from the convention.
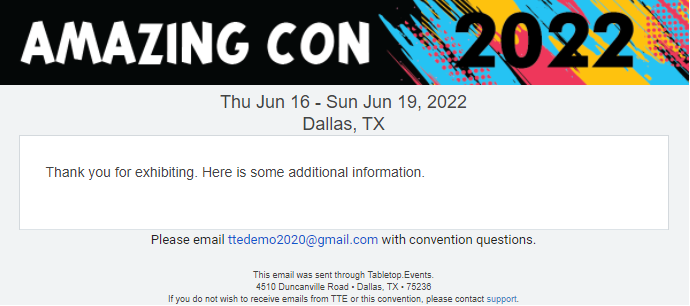
- Exhibitor Information: (From convention to exhibitor contact email) If the convention has enabled the Send Exhibitors Info Email? option, the exhibitor contact will receive an email from the convention when a booth is chosen or assigned.
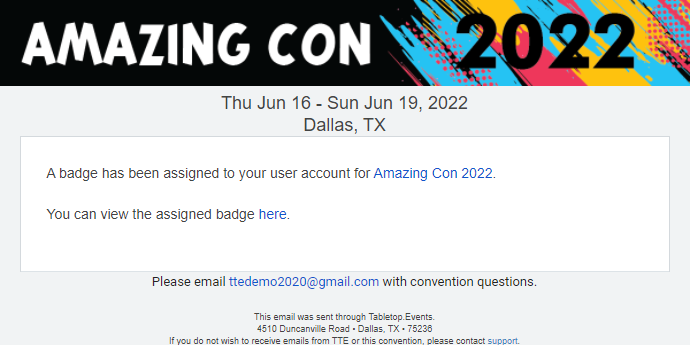
- Assigned Badge to Account (From convention to badge email) If the booths or sponsorships included badges, an email telling them a badge has been assigned will be sent in addition to the badge verification email (Manage Registration (Badges / Tickets)) if it is enabled for the badge type assigned to booths or sponsorships.
View Exhibitors / Sponsors
- To view the exhibitor / sponsor page, go to Convention Tools > Exhibitors / Sponsors / Exhibitors.
- The Approved Exhibitors screen will be displayed.
- Find the exhibitor / sponsor you wish to view and click "Manage". Choose View from the drop down list.
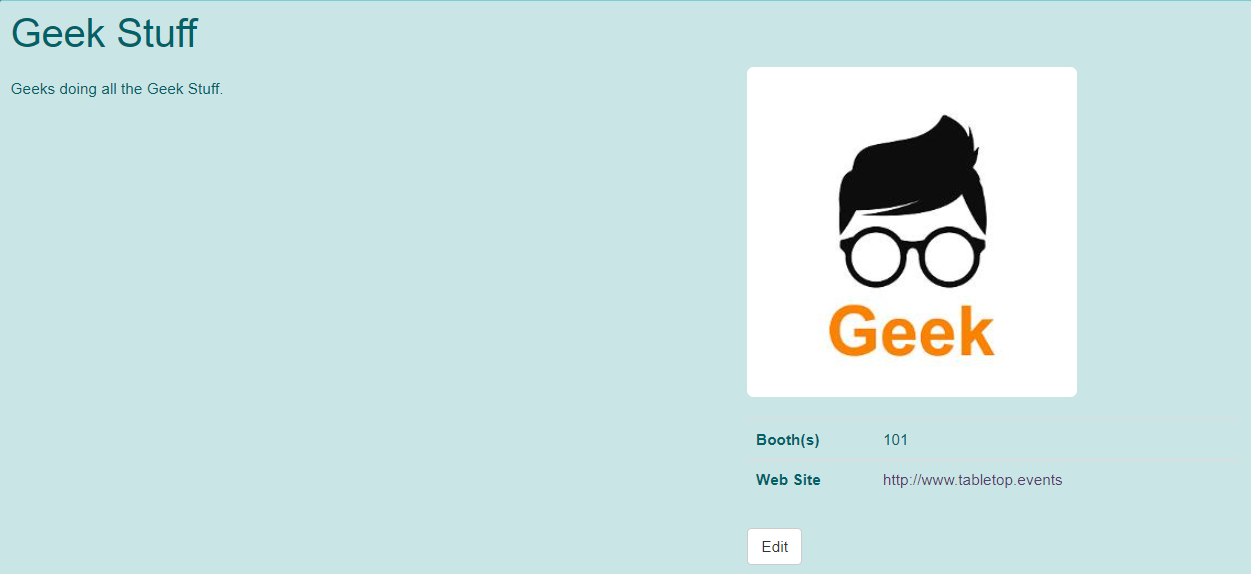
- This will display the [exhibitor / sponsor] screen.

Edit Exhibitors / Sponsors
- To edit the exhibitor / sponsor go to Convention Tools > Exhibitors / Sponsors > Exhibitors. Or you can click "Edit" at the bottom of the [exhibitor / sponsor] page.
- The Approved Exhibitors screen will be displayed.
- Find the exhibitor / sponsor you wish to edit and click "Manage". Choose Edit from the drop down list.
- This will display the Edit Application screen.
- Here you can edit any of the fields from the application.
- As the convention organizer, you can also edit Max Booths, Approved Zone, or the Application Owner. If you change the TTE owner, this does not update the exhibitor contact. This will have to be edited separately.
Unapprove
- If you wish to unapprove an exhibitor, go to Convention Tools > Exhibitors / Sponsors > Exhibitors.
- The Approved Exhibitors screen will be displayed.
- Find the exhibitor / sponsor you wish to unapprove and click "Manage". Choose Unapprove from the drop down list.
Delete
- If you wish to delete an exhibitor, go to Convention Tools > Exhibitors / Sponsors > Exhibitors.
- The Approved Exhibitors screen will be displayed.
- Find the exhibitor / sponsor you wish to delete and click "Manage". Choose Delete from the drop down list.
Exhibitor Booths
Edit Booths
- Sometimes it is necessary to edit the booth of an exhibitor. Go to Convention Tools > Exhibitors / Sponsors > Exhibitors
- The Approved Exhibitors screen will be displayed.
- Find the exhibitor / sponsor you wish to edit and click "Manage". Choose Edit Booths from the drop down list.
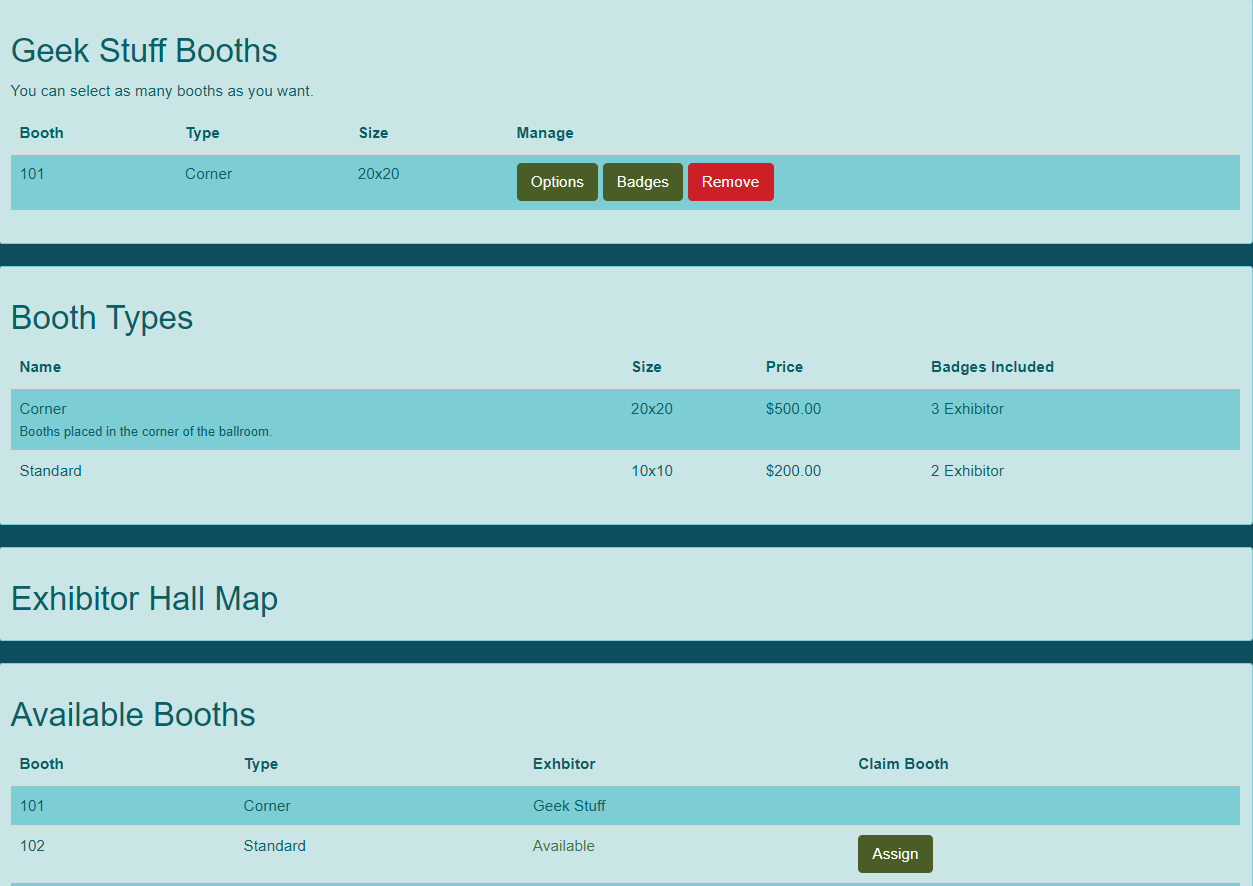
- The [exhibitor] Booths screen will be displayed.
- At the top is the list of any current booths associated with the Exhibitor.
- You can click "Assign" next to a booth in the Available Booths section to assign booth(s) to the exhibitor. The exhibitor will NOT be charged for booths added this way.
Options
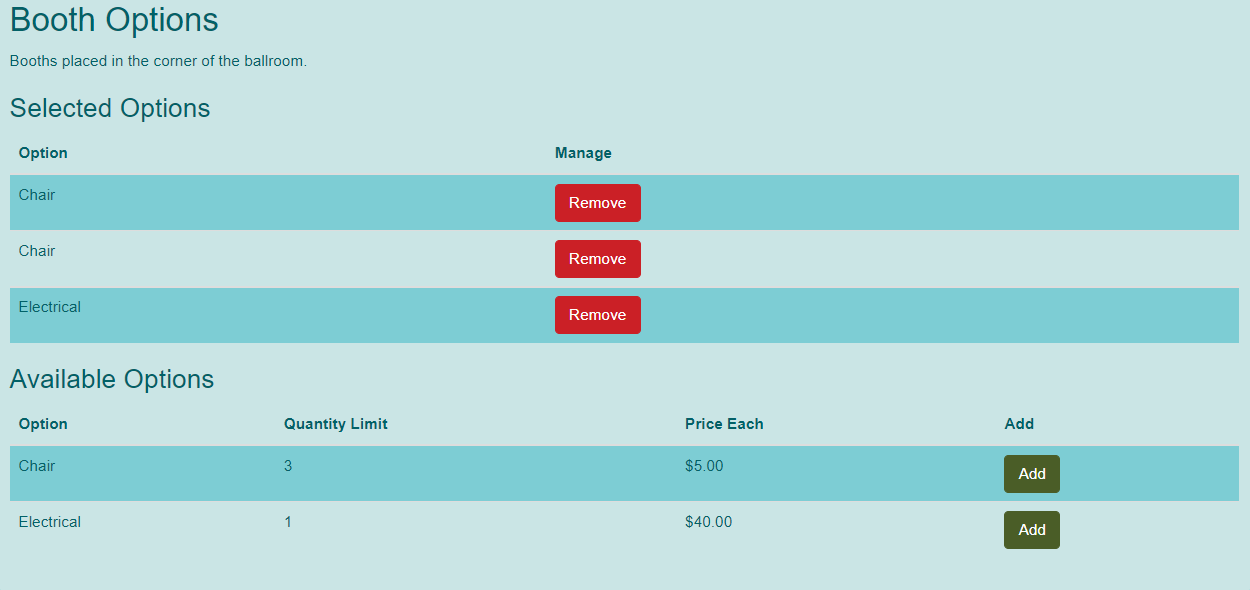
- To edit the options for a booth, click "Options".
- The Edit [booth] screen will be displayed.
- In the Booth Options section, you can click "Remove" or "Revoke" to remove an option from the booth.
- If the option has an amount paid associated with it, system will do refund if possible. All convenience fees are not refunded and the refund will be reduced by any percentage you have entered in the Refund Fee Percentage in Convention Tools > Financials > Settings if you have it applied to booth add-ons. Otherwise the option is just removed from the system.
- If it is past the refund deadline, you can click "Revoke". This will not refund any amount.
- You can click "Add" next to Options in the Available Options section to assign additional options to the booth. The exhibitor will NOT be charged for options added this way.
Badges
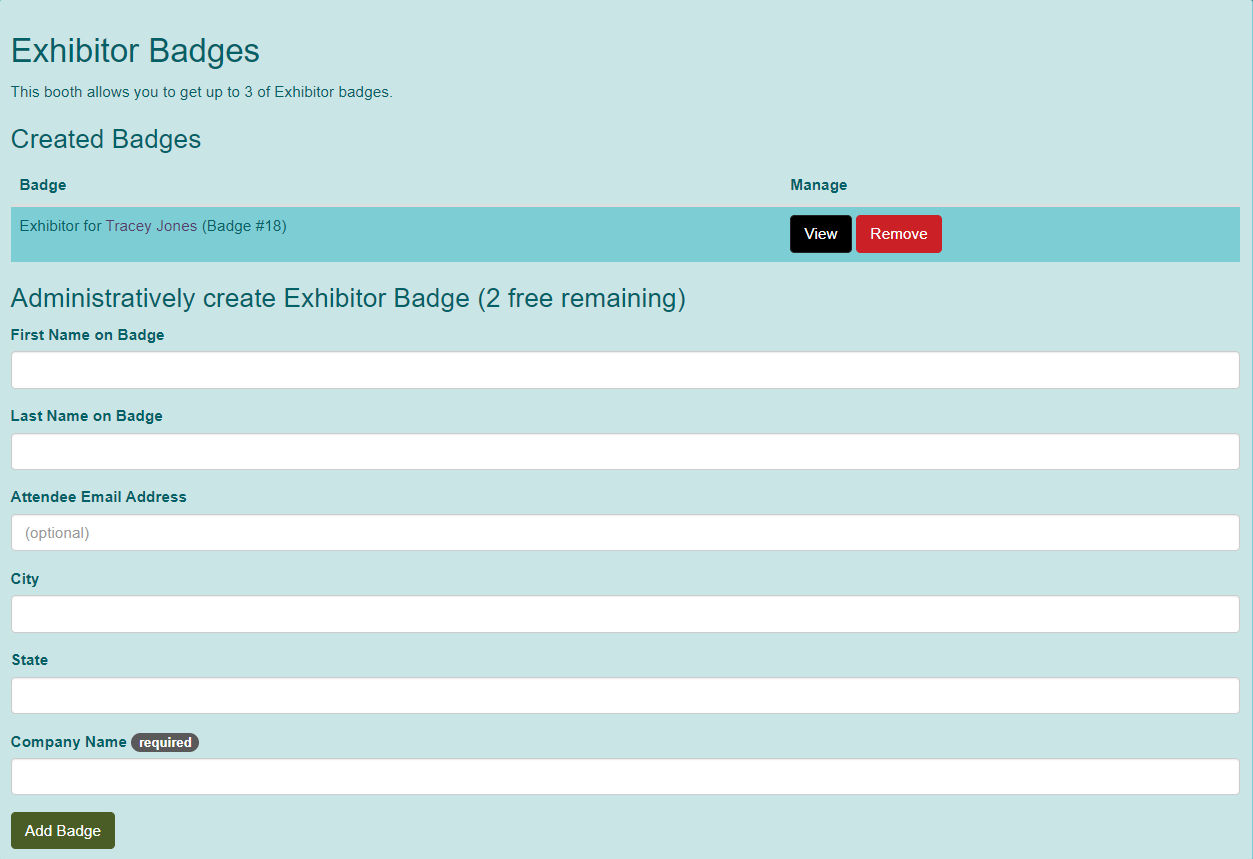
- To edit the badges for a booth, click "Badges".
- The Edit [booth] screen will be displayed.
- In the Exhibitor Badges section, you can click "Remove" or "Revoke" to remove a badge from the booth.
- If the badge has an amount paid associated with it, the system will do refund if possible. All convenience fees are not refunded and the refund will be reduced by any percentage you have entered in the Refund Fee Percentage in Convention Tools > Financials > Settings if you have it applied to badges. Otherwise the badge is just removed from the system.
- If it is past the refund deadline, you can click "Revoke". This will not refund any amount.
- You can center badge information in the Administratively create Exhibitor Badge section. The exhibitor will NOT be charged for badges added this way.
Remove
- To remove a booth from an exhibitor, click "Remove".
- If the booth has an amount paid associated with it, the system will do refund if possible. All convenience fees are not refunded and the refund will be reduced by any percentage you have entered in the Refund Fee Percentage in Convention Tools > Financials > Settings if you have it applied to booths. Otherwise the booth is just removed from the system.
Moving Booths
There is not an easy way to move an exhibitor to another booth without refunding the old booth and purchasing the new booth. Since fees are non-refundable this means that your exhibitor would have to pay the Stripe and TTE fees gain. You can work around the refund / purchase by changing the name of the booth to which the exhibitor is assigned.
- Go to Convention Tools > Exhibitors / Sponsors / Booths.
- Rename the empty booth (101 to 101temp).
- Rename the assigned booth to the original name of the empty booth (202 to 101).
- Rename the empty booth to the original name of the assigned booth (101temp to 202).
Re-email Exhibitor Info
- To resend the exhibitor information email due to a change in contact or lost email, go to Convention Tools > Exhibitors / Sponsors > Exhibitors.
- The Approved Exhibitors screen will be displayed.
- Find the exhibitor / sponsor you wish to email and click "Manage". Choose Re-email Exhibitor Info from the drop down list.
Sponsorships
Edit Sponsorships
- Sometimes it is necessary to edit the sponsorship of an exhibitor. Go to Convention Tools > Exhibitors / Sponsors > Exhibitors.
- The Approved Exhibitors screen will be displayed.
- Find the exhibitor / sponsor you wish to edit and click "Manage". Choose Edit Sponsorships from the drop down list.
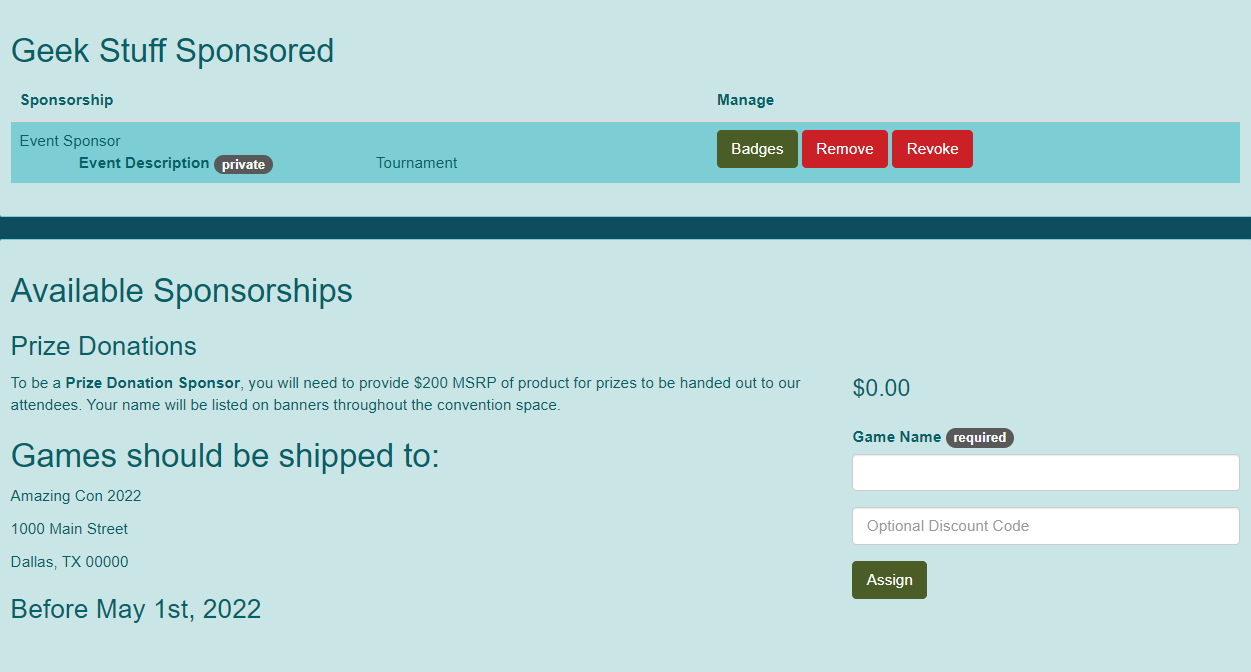
- The [exhibitor] Sponsored screen will be displayed.
- At the top is the list of any current sponsorships associated with the Exhibitor.
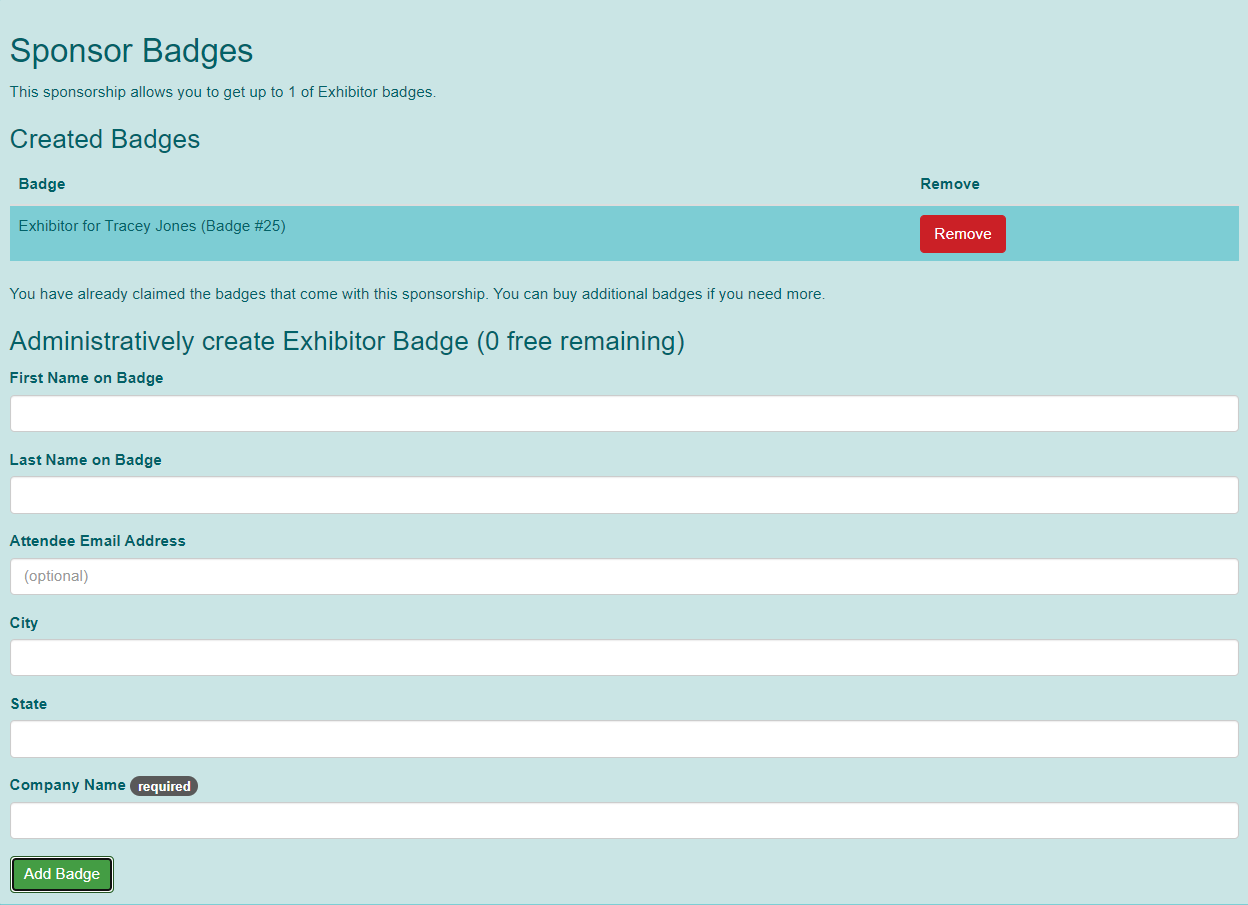
Badges
- To edit the badges for a sponsorship, click "Badges".
- The Edit Sponsorship screen will be displayed.
- In the Sponsor Badges section, you can click "Remove" or "Revoke" to remove a badge from the sponsorship.
- If the badge has an amount paid associated with it, the system will do refund if possible. All convenience fees are not refunded and the refund will be reduced by any percentage you have entered in the Refund Fee Percentage in Convention Tools > Financials > Settings if you have it applied to badges. Otherwise the badge is just removed from the system.
- If it is past the refund deadline, you can click "Revoke". This will not refund any amount.
- You can center badge information in the Administratively create Exhibitor Badge section. The exhibitor will NOT be charged for badges added this way.
Remove / Revoke
- To remove a sponsorship from an exhibitor, click "Remove" or "Revoke".
- If the sponsorship has an amount paid associated with it, the system will do refund if possible. All convenience fees are not refunded and the refund will be reduced by any percentage you have entered in the Refund Fee Percentage in Convention Tools > Financials > Settings if you have it applied to sponsorships. Otherwise the sponsorship is just removed from the system.
- You can click "Assign" next to a sponsorship in the Available Sponsorships section to assign sponsorship(s) to the exhibitor. The exhibitor will NOT be charged for sponsorships added this way.
Reports
Summary
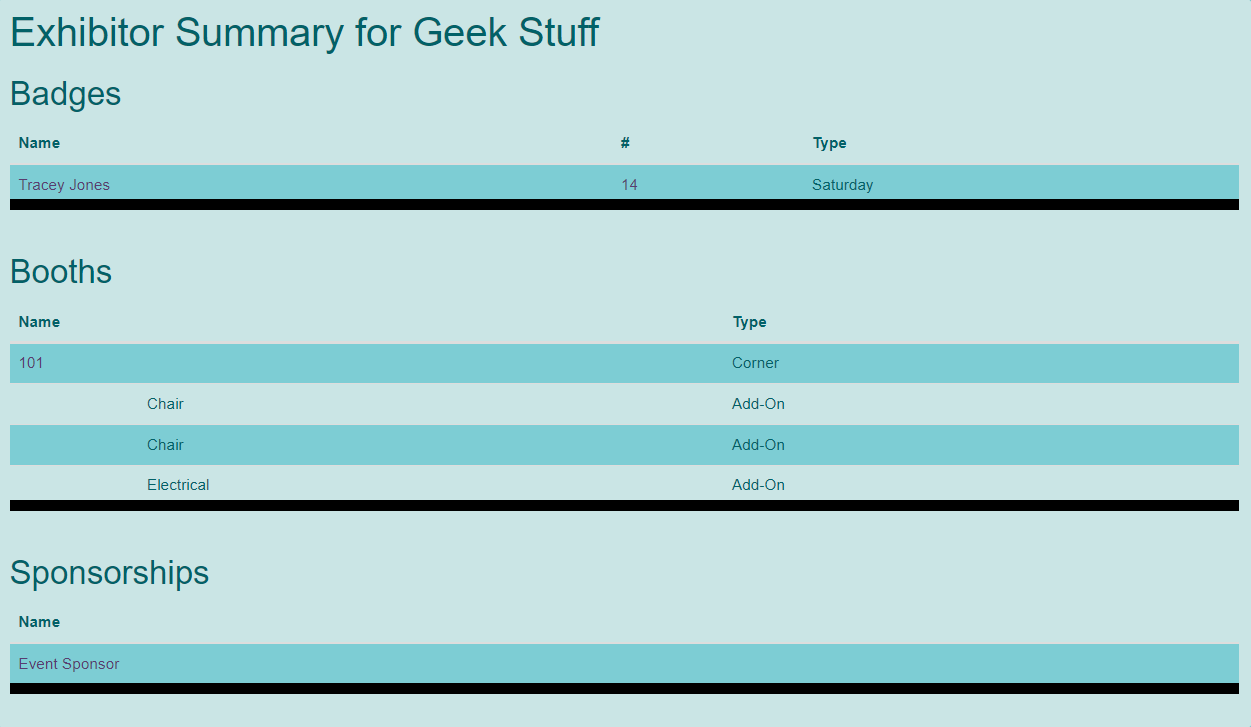
- To see a summary of everything assigned to an exhibitor, go to Convention Tools > Exhibitors / Sponsors > Exhibitors.
- The Approved Exhibitors screen will be displayed.
- Find the exhibitor / sponsor you wish to summarize and click "Manage". Choose Summary from the drop down list.
- The Exhibitor Summary for [exhibitor] screen will be displayed.
Export
- You can export your exhibitors by going to Convention Tools > Exhibitors / Sponsors > Exhibitors and clicking "Export" at the top right corner of the screen. You can also go through Convention Tools > Reports under the Exhibitors and Sponsors section and choose Export Exhibitor / Sponsor data.
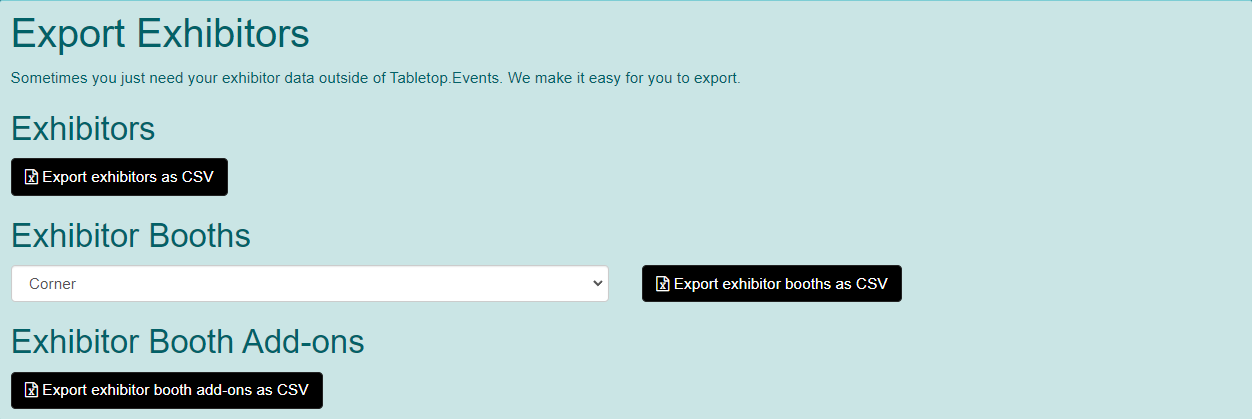
- This will display the Export Exhibitors screen.
- To export a list of exhibitors, in the Exhibitors section, click "Export exhibitors as CSV".
- To export a list of booths, in the Exhibitor Booths section, choose a booth type from the drop down menu, and click "Export exhibitor booths as CSV".
- To export a list of booth add-ons, in the Exhibitor Booth Add-Ons section, click "Export exhibitor booth add-ons as CSV."