
Manage Registration (Badges / Tickets)
After you have opened badge and ticket sales for your convention,
attendees are free to purchase their badges and tickets.
- Purchase Convention Badge
- Purchase / Register Tickets for Convention Event
- Refund or Convert Convention Badge / Ticket / Merch Purchase
This document will walk you through the work flow and system generated emails for each type of purchase. Additionally, various management functions are detailed to assist you in managing registration for your convention.
Badges
- Workflow and Emails
- Administratively Create Badge
- Badge Assigned to Not Yet Activated TTE Account
- Badge Edit
- Convert Badge Type
- Delete
- Refund / Revoke Badge
- Reports
Workflow and Emails
When a badge is purchased by an attendee, there are multiple emails that may go out depending on the exact situation. Once a badge has been created, the email associated with the badge is considered to be the badge email. This may be different than the TTE account email.
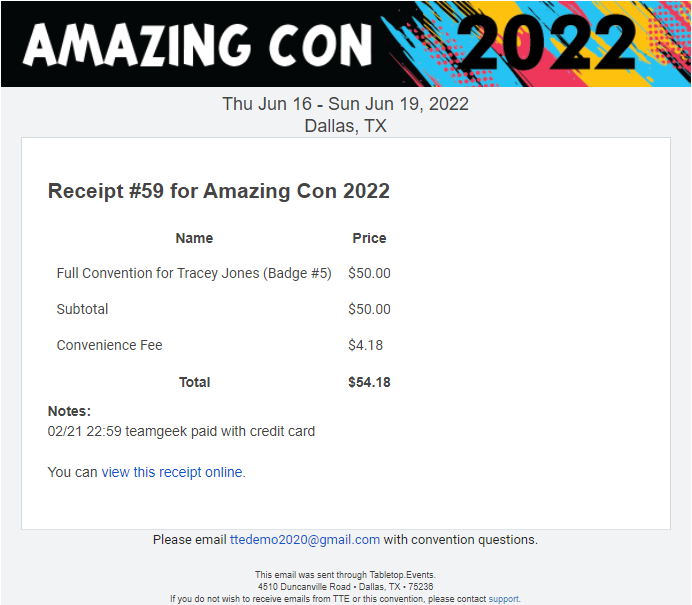
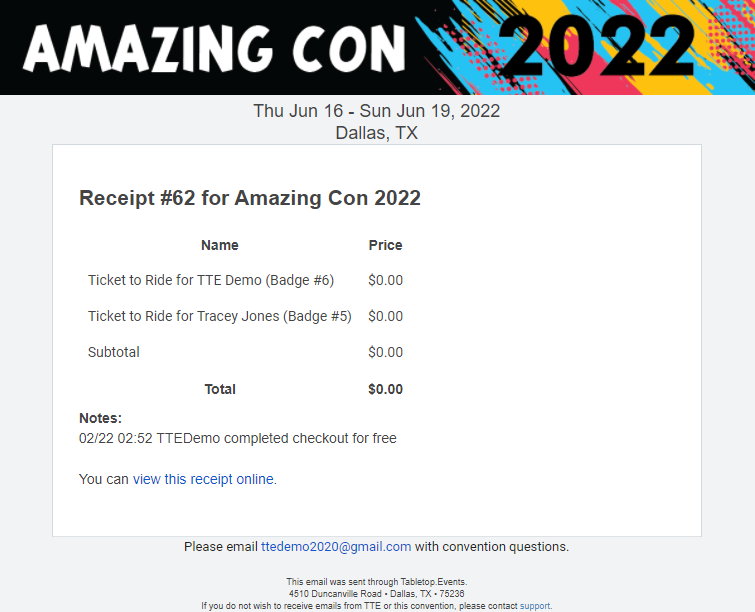
- Receipt: (From convention to TTE account email) Whoever paid for the badge will get a receipt email from the convention.
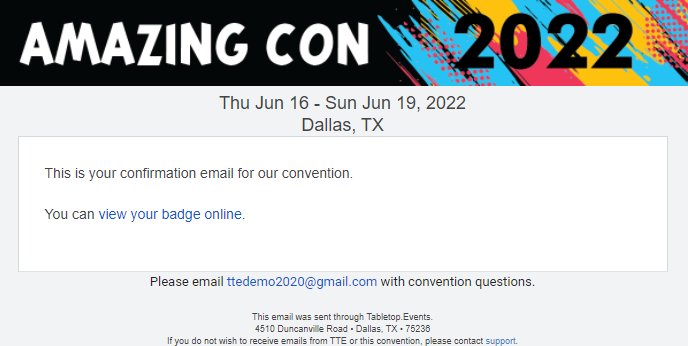
- Badge Verification: (From convention to badge email) If the convention has enabled the Message badge holder on badge verification? option for the badge type, the badge holder will receive an email from the convention with a link to view the badge online.
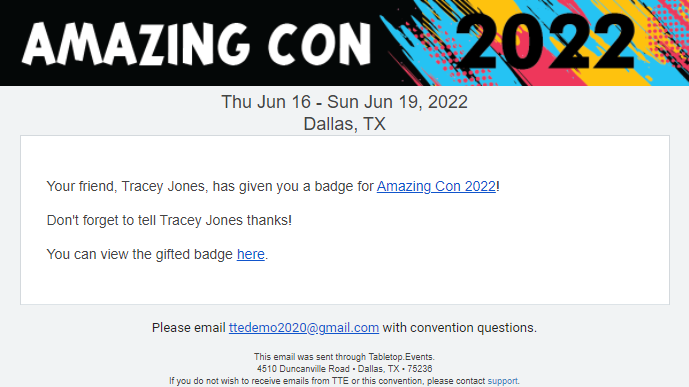
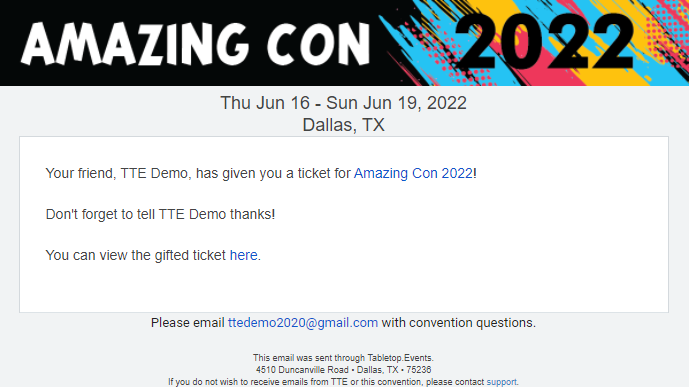
- Gifted Badge: (From convention to badge email) If the badge was purchased for someone else through the friend system or permissive gifting, the badge holder will receive notification that they have been gifted a badge.
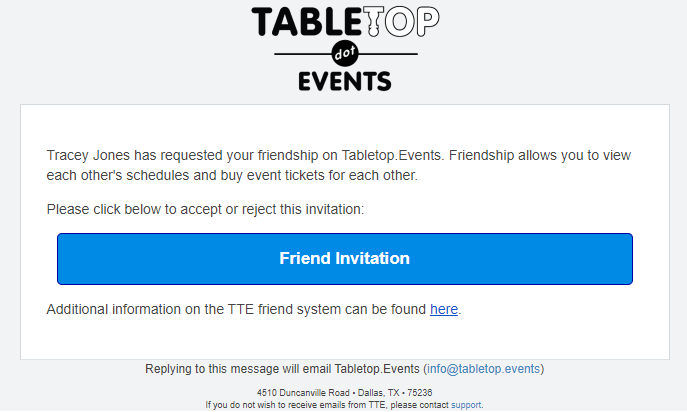
- Friend Invite: (From TTE to TTE account email) If the badge was purchased through permissive gifting, the badge holder will be notified that the purchaser would like to be their friend on TTE.
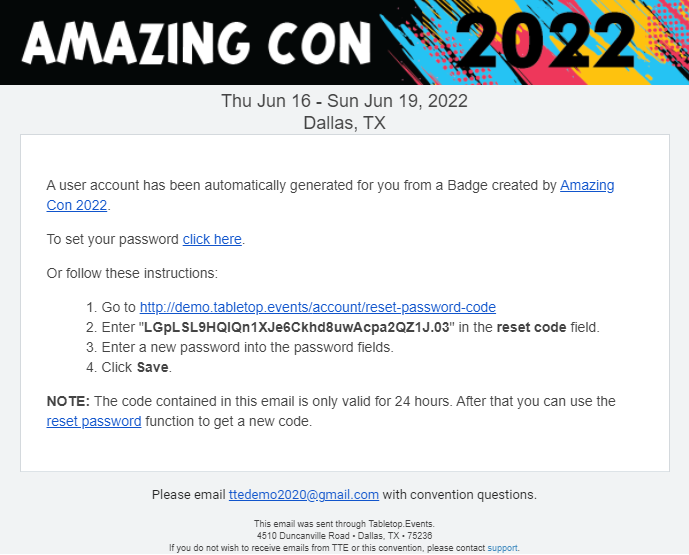
- Set Password for New Account: (From convention to TTE account email) If the badge was purchased through permissive gifting and the attendee did not already have a TTE account, the badge holder will be asked to set a password for the account that was created for them.
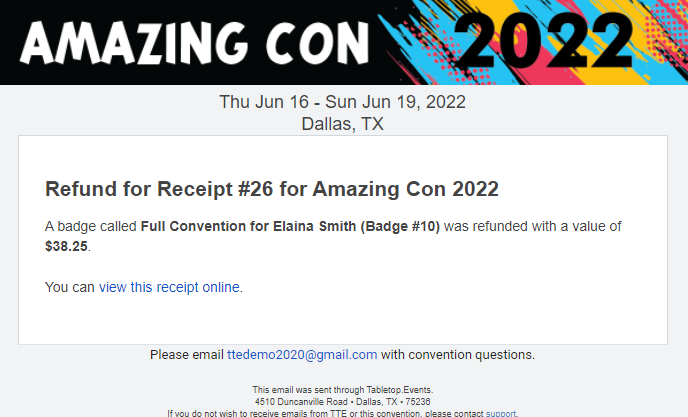
- Refund: (From convention to TTE account email) Whoever paid for the badge will get a refund email when an item from that receipt is refunded.
Administratively Create Badge
At some point, it may become necessary to add a badge to your convention and bypass the purchase process.
- Go to Convention Tools > Registration > Badges.
- This will display the Badges screen with your sold badges and the Administratively Create A Badge section at the bottom of the screen.
- Enter the First Name, Last Name and Email Address.
- In this situation, it is important the Email Address you enter matches their TTE account email (if they have one). If TTE cannot match the badge email to a TTE account email, a new TTE account will be created for the badge holder.
- Choose the appropriate Badge Type.
- Click "Create".
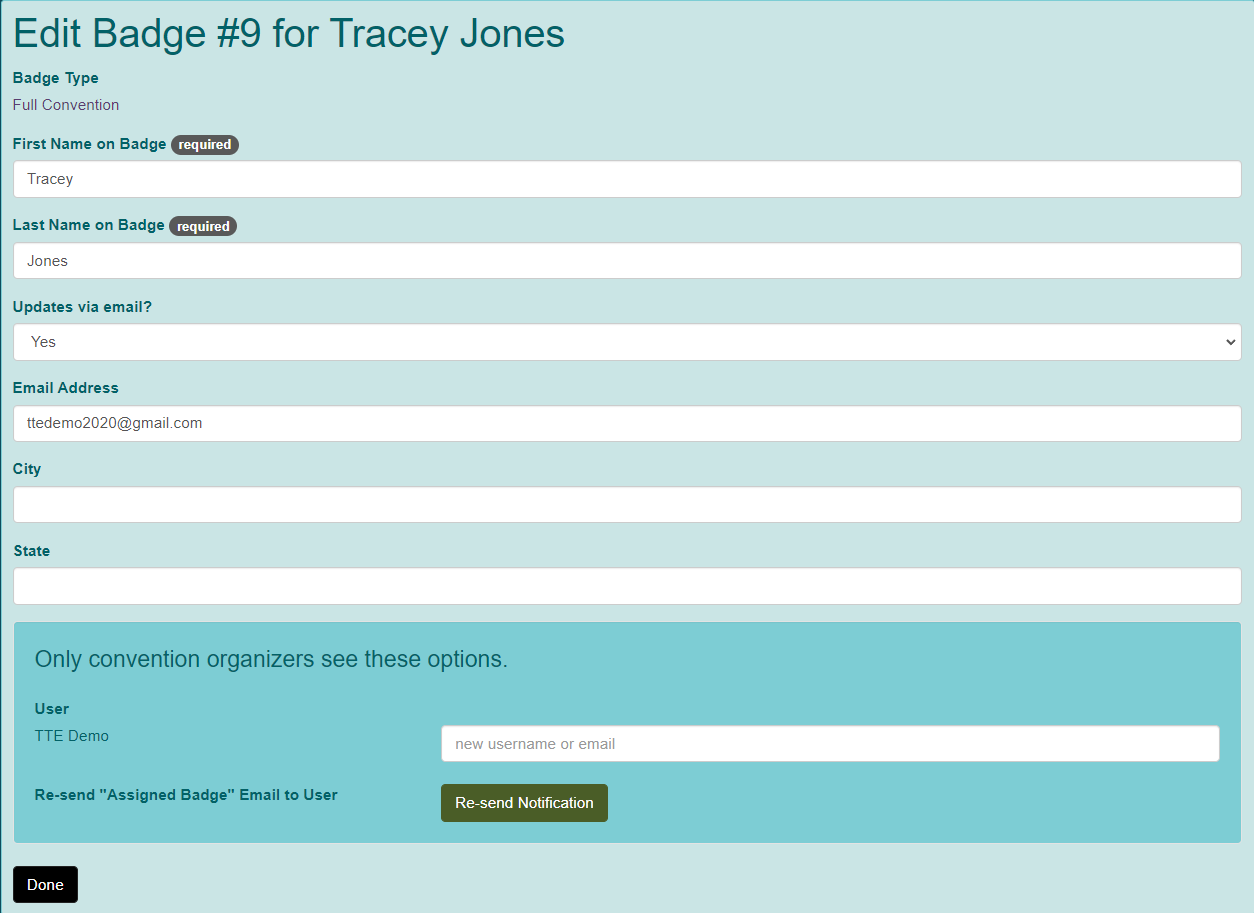
- This will display the Edit Badge screen.
- Enter any additional custom fields you included on your badge registration.
- Click "Done".
- Emails will be sent out as described above. No receipt is sent since there was no financial transaction.

Importing Badges
- You can import a list of badges through the import function. Each badge type must be imported separately.
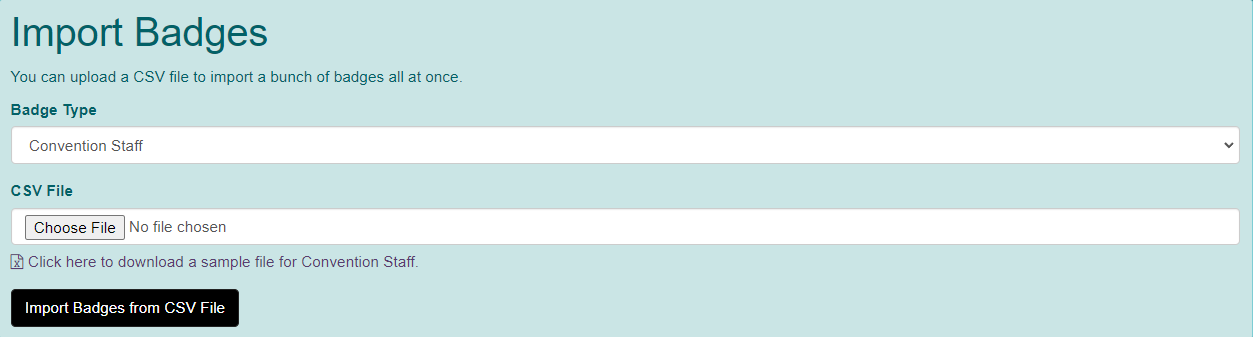
- In the Administratively Create A Badge section, click "Import" at the top-right.
- The Import Badges screen will be displayed.
- A sample CSV file is available to download. Once your file is built, click "Choose File" and select the file you just built.
- Click "Import Badges from CSV File".
Badge Assigned to Not Yet Activated TTE Account
If a badge has been purchased through permissive gifting or administratively created for an email address not currently linked to a TTE account, the badge remains in an unverified status until the TTE account has been activated. In the Convention Tools > Registration > Badges screen, the badge will appear like this:

The "i" symbol will go away once the user has created a TTE account to claim the badge.
Badge Edit
Badges can be edited after they are created. Convention organizers are always able to edit badges, and attendees are able to edit badges if the Allow Badge Editing? field in Convention Tools > Registration > Settings is set to Yes. Convention Organizers are also allowed to change the TTE account to which a badge is assigned.
- Go to Convention Tools > Registration > Badges.
- Next to the badge to be edited, click "Manage" and choose Edit from the drop down list.
- Type a new TTE username or email.
- Next to the appropriate TTE user in the list of possible matches, click "Choose".
- If you have enabled Message badge holder on badge verification?, you can click "Re-send Notification" to send email to the new owner.

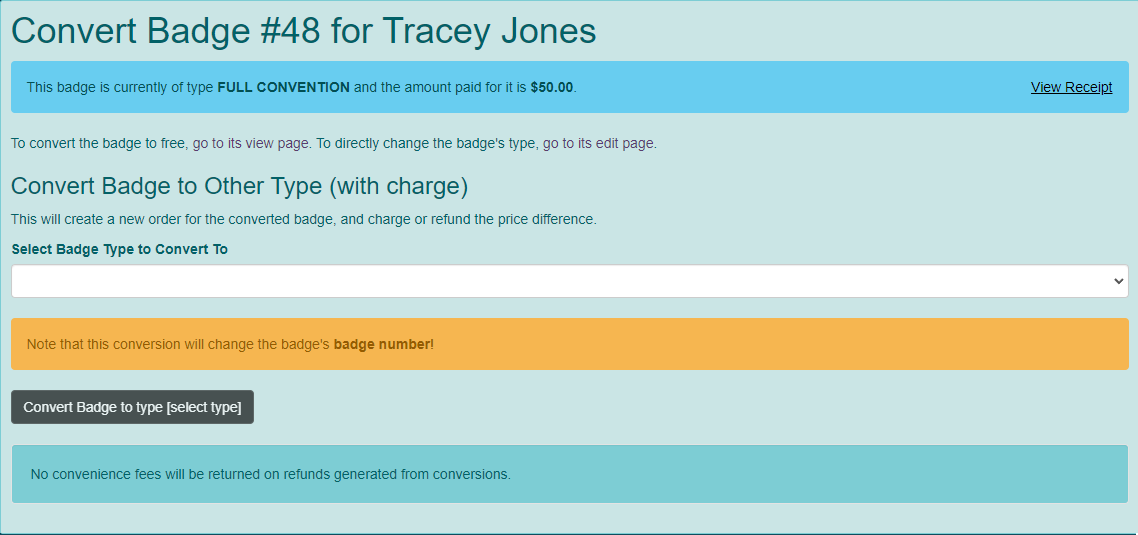
Convert Badge Type
Sometimes it is necessary to change a badge from one type to another. The badge can be converted to another type without changing the amount paid, to another type with either money either charged or refunded, and to a free badge.
Convert with Charge
- Go to Convention Tools > Registration > Badges.
- Next to the badge to be converted, click "Manage" and choose Convert from the drop down list. Or click "Manage" and choose Edit from the drop down list. Then choose "Convert" on the Badge screen.
- The Convert Badge screen will be displayed.
- If you wish to convert a badge to another type and either refund or charge the difference in price, choose the correct badge type in Select Badge Type to Convert To field in the Convert Badge to Other Type section. Then click the "Convert Badge to type [badge type]" button. This process will change the badge number. Convenience fees will only charged on the additional amount charged. If any money is refunded, convenience fees are not returned.
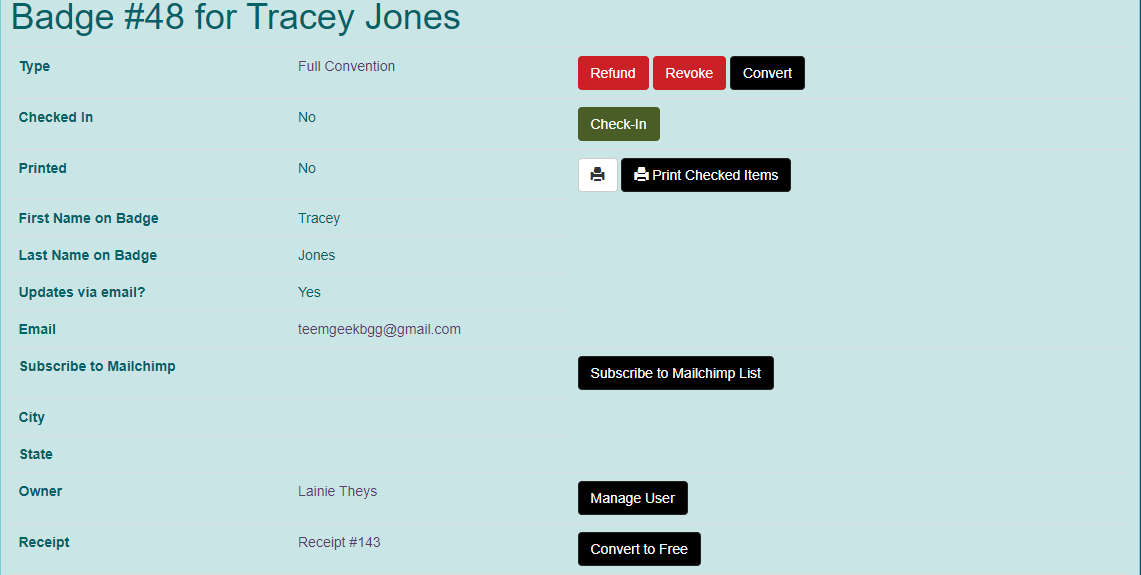
Convert to Free
- If you wish to convert a badge to a free badge, go to Convention Tools > Registration > Badges.
- Next to the badge to be converted, click "Manage" and choose View from the drop down list.
- Click "Convert to Free". The system will prompt you to confirm your choice.
- Click "OK". Convenience fees are not returned.

Convert without Financial Impact
- If you wish to convert the badge to another badge type and not change the amount paid, go to Convention Tools > Registration > Badges.
- Next to the badge to be converted, click "Manage" and choose Edit from the drop down list.
- Change the badge type as needed. No financial information will be impacted.

Delete Badge
- Go to Convention Tools > Registration > Badges.
- Next to the badge to be deleted, click "Manage" and choose Delete from the drop down list.
- If the badge has an amount paid associate with it, the system will do refund if possible. All convenience fees are not refunded and the refund will be reduced by any percentage you have entered in the Refund Fee Percentage in Convention Tools > Financials > Settings if you have it applied to badges. Otherwise the badge is just removed from the system.
Refund / Revoke Badge
There are three levels of users who can refund / revoke badges. Attendees can only initiate refunds before the Refund Deadline. Convention organizers who have their rights assigned through Convention Tools > Convention Setup > Privileges can initiate refunds through the end of the convention. Convention organizers who are Directors or Leaders of the group, can initiate refunds whenever necessary.
- Go to Convention Tools > Registration > Badges.
- Next to the badge to be refunded, click "Manage" and choose View from the drop down list.
- This will display the Badge screen.
- If the badge does not have an amount paid associated with it, click the "Delete" button next to the type.
- If the badge does have an amount paid associated with it, click the "Refund" button next to the type. All convenience fees are not refunded and the refund will be reduced by any percentage you entered in the Refund Fee Percentage in Convention Tools > Financials > Settings if you have it applied to badges.
- If it is past the refund deadline, you can click "Revoke". This will not refund any amount; however, it will make the badge available to be purchased by another attendee.
Reports
Badge Sales
You can view the overall badge sales for each badge type by going to Convention Tools > Registration > Badges and clicking "Sales" at the top right corner of the screen. You can also go through Convention Tools > Reports under the Badges and Tickets section and choose View Badge Sales.

Export Badges
You can export your badges by going to Convention Tools > Registration > Badges and clicking "Export" at the top right corner of the screen. You can also go through Convention Tools > Reports under the Badges and Tickets section and choose Export Badges. You can export the entire list or a specific badge type. Click "Export Badges as CSV".

Tickets
- Workflow and Emails
- Administratively Create Ticket
- Convert Ticket
- Delete / Refund / Revoke Ticket
- Export Tickets
Workflow and Emails
When a ticket is purchased by an attendee, there are multiple emails that may go out depending on the exact situation. The emails will go to the badge email on file.
- Receipt: (From convention to TTE account email) Whoever paid for the ticket will get a receipt email from the convention.
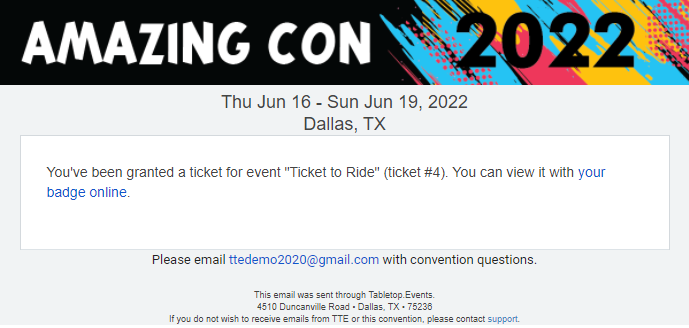
- Gifted Badge: (From convention to badge email) If the ticket was purchased for someone else through the friend system, the badge holder will receive notification that they have been gifted a ticket.
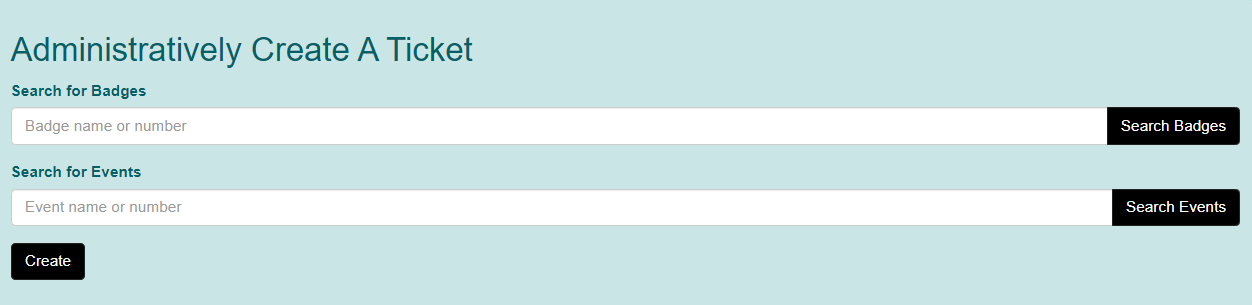
Administratively Create Ticket
At some point, it may become necessary to add a ticket to a badge holder and bypass the purchase process.
- Go to Convention Tools > Registration > Tickets.
- This will display the Tickets screen with your sold tickets and the Administratively Create A Ticket section at the bottom of the screen.
- Type the badge name or number and click "Search".
- Next to the appropriate badge from the list, click "Select".
- Type the event name or number and click "Search".
- Next to the appropriate event from the list, click "Select".
- Click "Create".
- The system will send an email from the convention to the badge email.
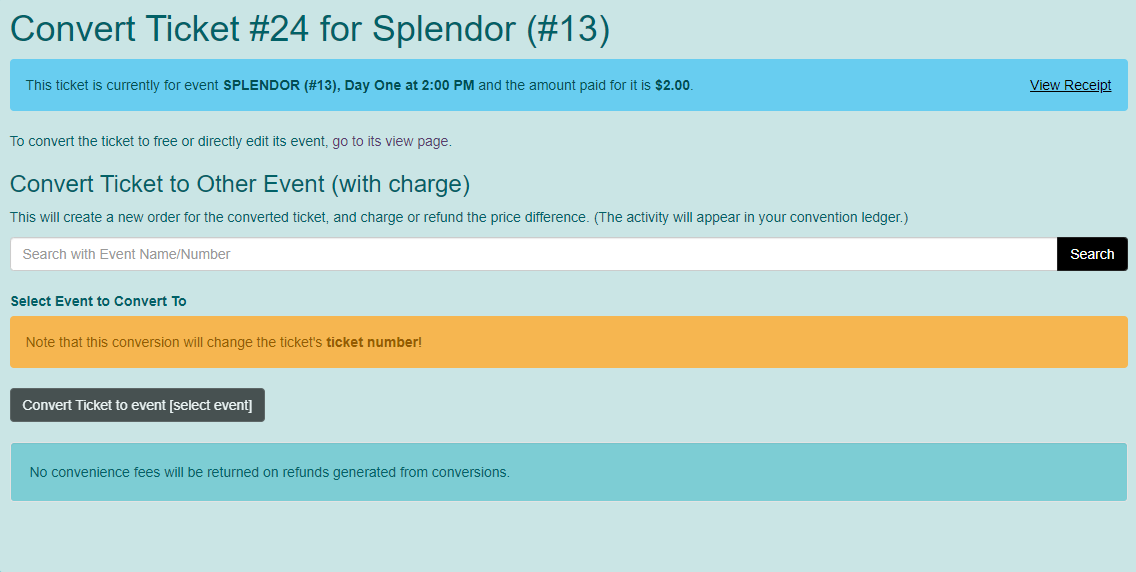
Convert Ticket
Sometimes it is necessary to change a ticket from one event to another. The ticket can be converted to another event without changing the amount paid, to another event with either money either charged or refunded, or to a free ticket.
Convert with Charge
- Go to Convention Tools > Registration > Tickets.
- Next to the ticket to be converted, click "Manage" and choose Convert from the drop down list.
- The Convert Ticket screen will be displayed.
- If you wish to convert a ticket to another event and either refund or charge the difference in price, search for the event name or number in the Convert Ticket to Other Event section. Then click the "Convert Ticket to event [select event]" button. This process will change the ticket number. Convenience fees will only charged on the additional amount charged. If any money is refunded, convenience fees are not returned.
Convert to Free
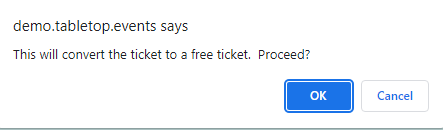
- If you wish to convert a ticket to a free ticket, go to Convention Tools > Registration > Tickets.
- Next to the ticket to be converted, click "Manage" and choose View from the drop down list.

- Click "Convert to Free". The system will prompt you to confirm your choice.
- Click "OK". Convenience fees are not returned.

Convert without Financial Impact
- If you wish to convert the ticket to another event and not change the amount paid, go to Convention Tools > Registration > Ticket.
- Next to the ticket to be converted, click "Manage" and choose from the drop down list.
- Enter the new event number or name and click "Search".
- In the Edit Ticket's Event field, choose the new event from the drop-down list. No financial information will be impacted.
- Go to Convention Tools > Registration > Tickets.
- Next to the ticket to be refunded, you will see "Delete", "Refund" and/or "Revoke".
- If the ticket does not have an amount paid associated with it, click the "Delete" button.
- If the ticket does have an amount paid associated with it, click the "Refund" button. All convenience fees are not refunded and the refund will be reduced by any percentage you entered in the Refund Fee Percentage in Convention Tools > Financials > Settings if you have it applied to tickets.
- If it is past the refund deadline, you can click "Revoke". This will not refund any amount; however, it will make the ticket available to be purchased by another attendee.
- You can also refund tickets by clicking "Edit" next to the ticket and clicking either "Delete", "Refund" or "Revoke" on this screen.
- If you are refunding tickets as part of refunding a badge, you can do so from the Tickets section of the badge screen.
Delete / Refund / Revoke Ticket
There are three levels of users who can refund / revoke badges. Attendees can only initiate refunds before the Refund Deadline. Convention organizers who have their rights assigned through Convention Tools > Convention Setup > Privileges can initiate refunds through the end of the convention. Convention organizers who are Directors or Leaders of the group, can initiate refunds whenever necessary.
Export Tickets
You can export your tickets by going to Convention Tools > Registration > Tickets and clicking "Export" at the top right corner of the screen. You can also go through Convention Tools > Reports under the Badges and Tickets section and choose Export Tickets. Click "Export Tickets as CSV".
