
Activate Registration Module (Badges)
Badge configuration is in the Registration module. After you have completed creating your convention, you can activate this module and configure badges to get them ready for sale. The Registration module can be configured when a convention is public or private. However, badge sales cannot begin until a Stripe Standard Account is configured for your convention.
- Activate Registration Module (Badges)
- Set Badge Settings
- Create Badge Type Categories (optional)
- Create Badge Types
- Setup Discount Codes (optional)
- Open Badge Sales
- Import Badge Type Categories and Badge Types
- Free Badge Configuration
- Tutorials
Activate Registration Module (Badges)
The Activate Registration Module Checklist is located to the right of the Getting Started Checklist. Expand the checklist for step-by-step instructions on registration setup.
Set Badge Settings
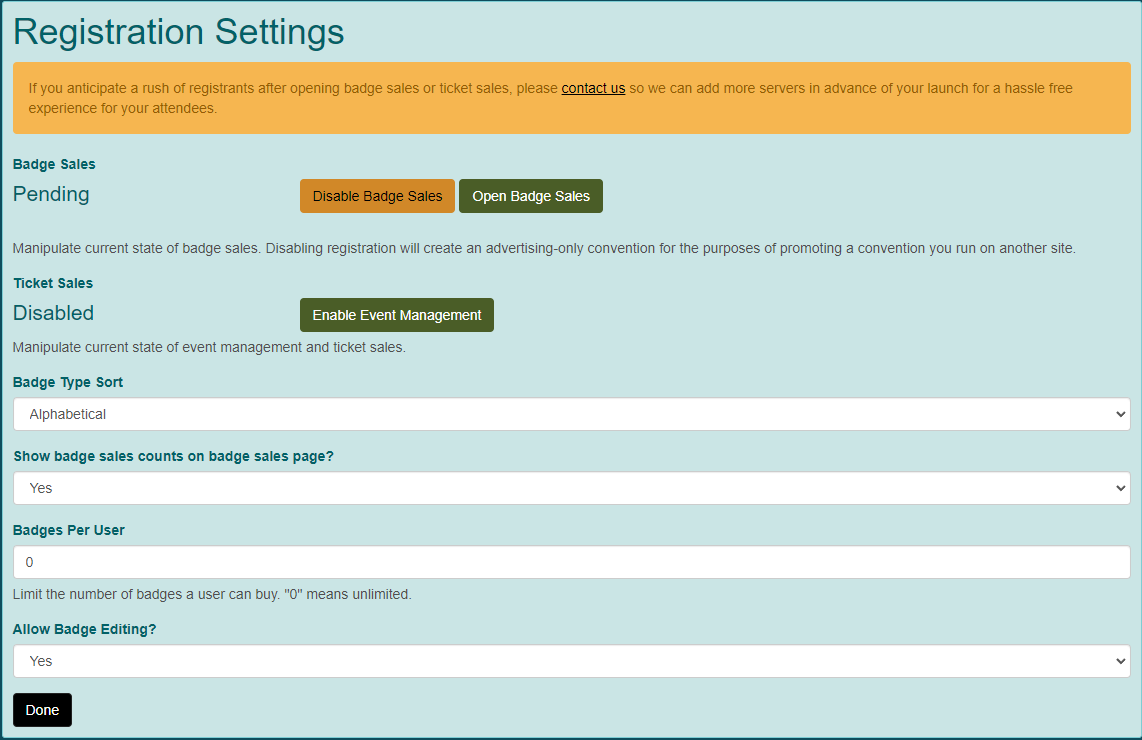
- Click on Set Badge Settings or go to Convention Tools > Registration > Settings.
- This will display the Registration Settings screen.
- Badge Sales: The default for this field is pending. You can "Disable Badge Sales" or "Open Badge Sales". Once badge sales have been opened, you have the choice to "Suspend Badge Sales" or "Close Badge Sales". If you close sales, you will not be able to reopen them.
- Ticket Sales: This will be documented in the Activate Scheduling Module.
- Badge Type Sort: Set the way you wish your badge types to be sorted on your sales page. Alphabetical sort will put the types in alphabetical order. Sequence number sort allows you to determine the order of the badge type list.
- Show badge sales counts: Set whether or not you wish attendees to be able to see how many badges of a type have been sold.
- Badges Per User: Determine the number of badges a user can purchase under their TTE account for your convention.
- Allow Badge Editing?: Set whether or not attendees can update their name, etc. on their badge after they have completed the purchase.
Create Badge Type Categories (optional)
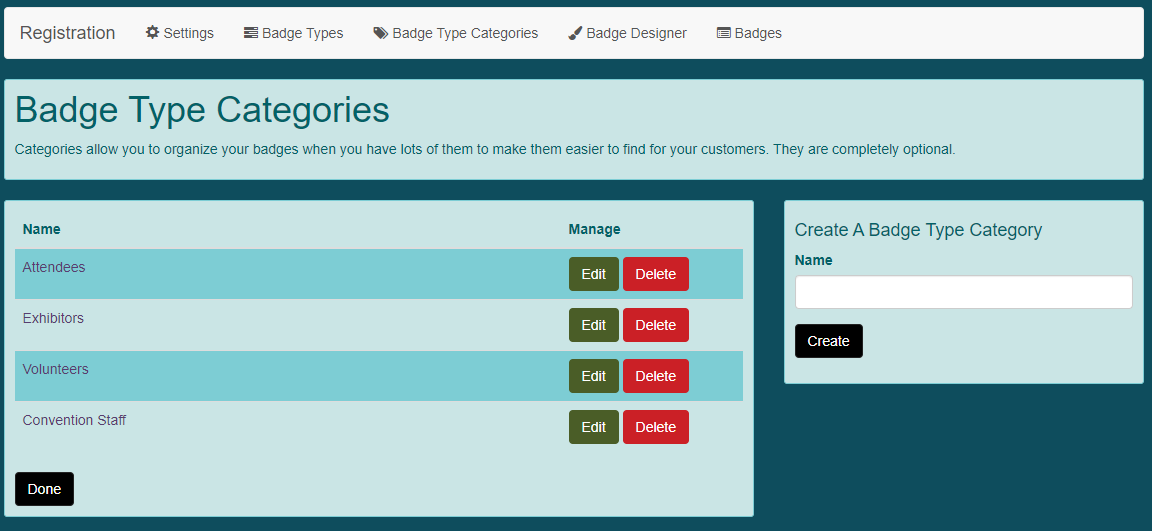
Badge type categories help to group your badges in the registration module. Category examples are Attendee, Exhibitors, Volunteers, Staff, etc. These can be imported from another convention. Go here for additional instructions.
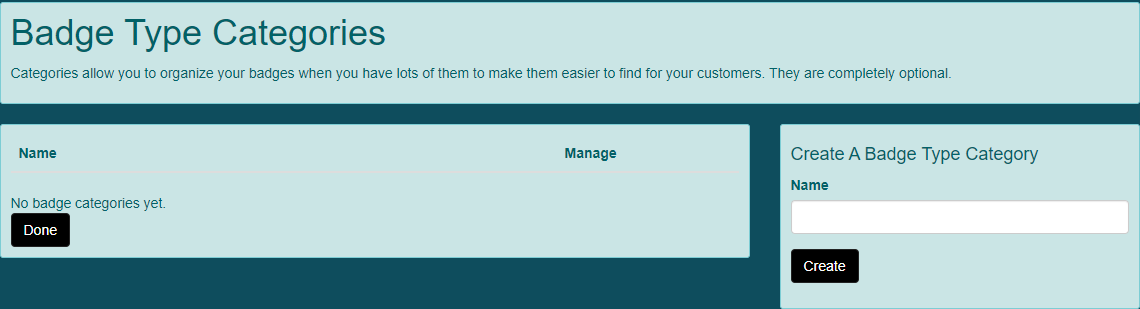
- Click on Create Badge Type Categories or go to Convention Tools > Registration > Badge Type Categories.
- This will display the Badge Type Categories screen.
- In the Create A Badge Type Category section, enter a Name for your category. Click "Create".
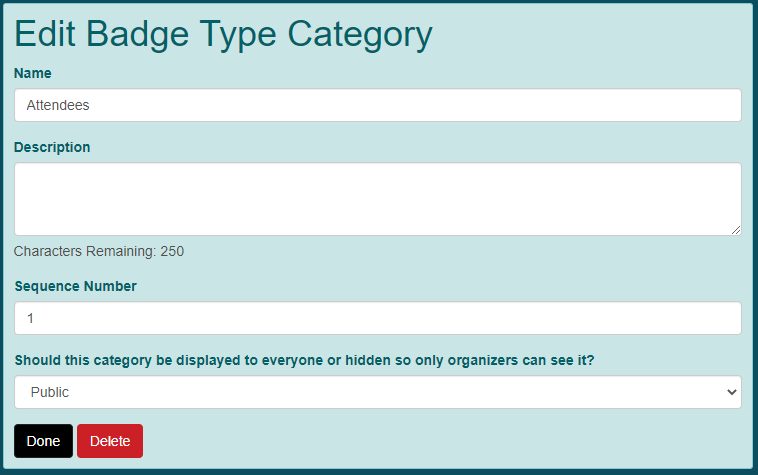
- This will display the Edit Badge Type Category screen.
- Name: The name you specified when you created the badge type category.
- Description: A description of the types of badges that will be in the category.
- Sequence Number: If you chose a sequence number sort in badge settings, this number will determine the order the categories will appear in the registration module.
- Should this category be displayed to everyone or hidden so only organizers can see it?: Categories that you will sell to the general public should be set to Public. If there are categories that should be seen only by certain people, set this to Private.
- Click "Done" when you are finished.
- Repeat steps 3 - 5 for each badge type category.
Create Badge Types
You will need a badge type for all the different badges you are selling at your convention. Examples include Full Convention, Saturday Only, GM, Exhibitor, Volunteer, Staff, etc. These can be imported from another convention. Go here for additional instructions.
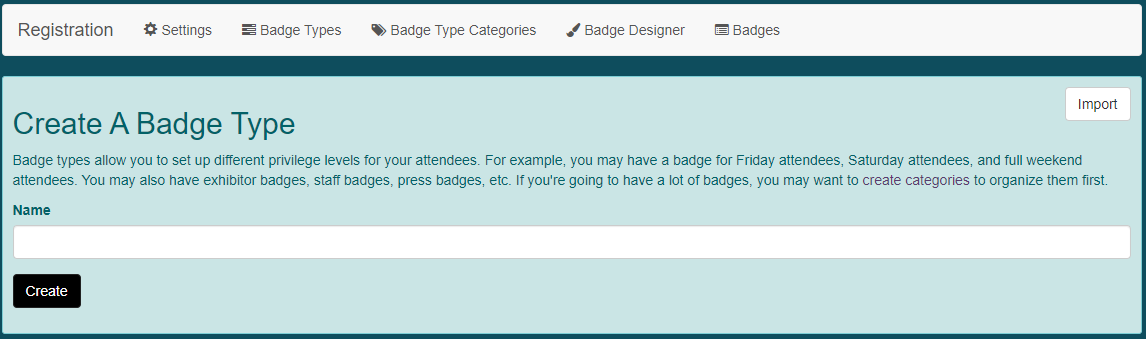
- Click on Create Badge Types or go to Convention Tools > Registration > Badge Types.
- This will display the Create A Badge Type screen.
- Enter a Name for your badge type and click "Create".
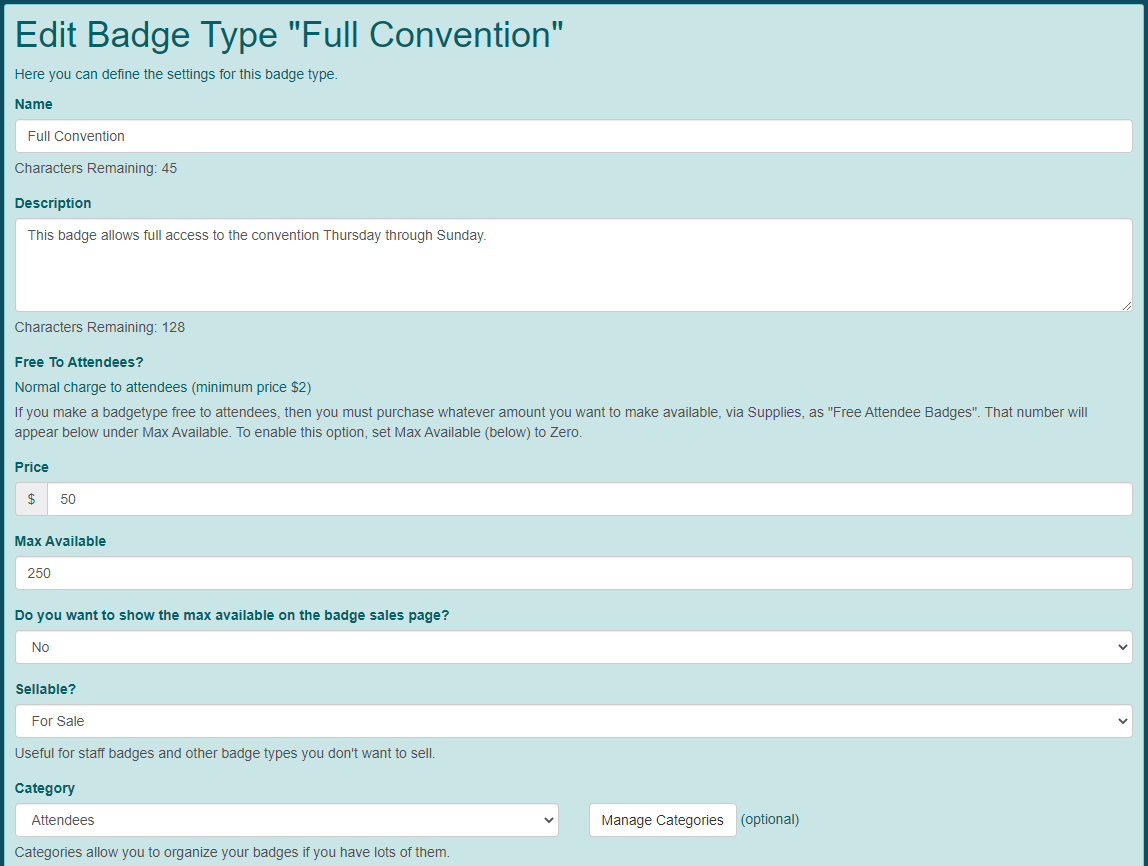
- This will display the Edit Badge Type screen.
- Name: The name you specified when you created the badge type.
- Description: A brief description of the badge type and anything that is included with purchase.
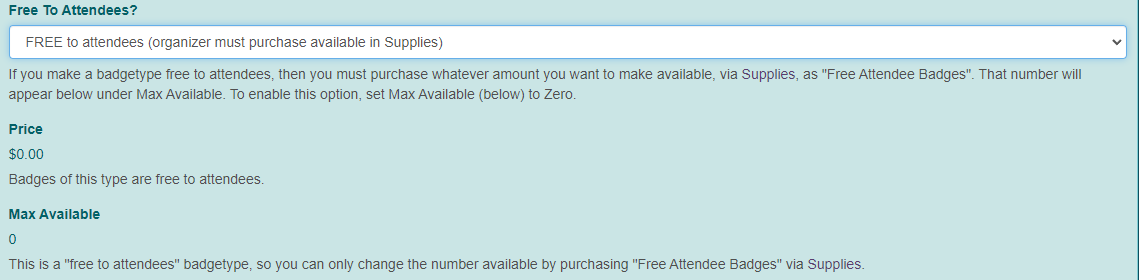
- Free to Attendees?: This field is discussed in greater detail here.
- Price: The selling price for the badge.
- Max Available: How many of this badge type will be available for your convention.
- Do you want to show the max available on the badge sales page?: Do you want to show attendees the number of that badge type you are making available.
- Sellable?: If this badge will not ever be sold, set this to Not For Sale. If you are selling the badge to any visitor to your convention site, set this to For Sale. If you are going to send private links to a badge type for a select group of people (i.e. staff), set this to Hidden From Public.
- Category: Choose a badge type category from the drop-down list. If you need to create or edit a category, click on "Manage Categories" to be taken back to the Badge Type Categories screen.
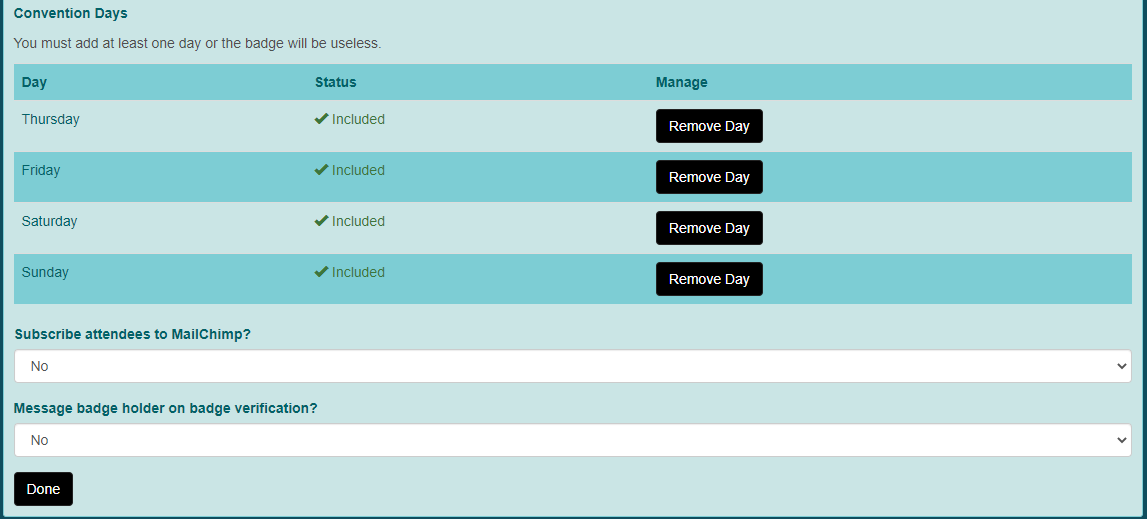
- Convention Days: Allows you to choose which days of the convention should be accessible by the badge type. Click "Add Day" next to each day that should be associated with the badge. To remove a day, click "Remove Day".
- Subscribe attendees to MailChimp?: Determine whether this type of badge will automatically be subscribed to updates about your convention via MailChimp. Additional information on this integration can be found here.
- Message badge holder on badge verification?: When a badge is purchased, the attendee will receive a receipt of their purchase. If you would like to have TTE send an additional welcome email to them, you can set this to yes. All emails sent by TTE on your behalf will have your contact email address as the reply to.
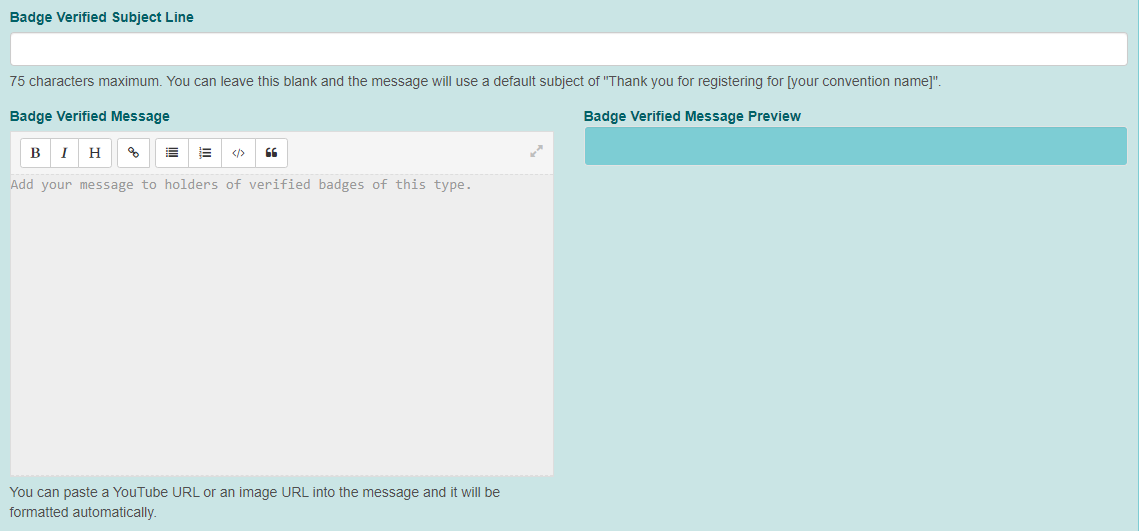
- Badge Verified Subject Line: Enter the subject line for the email.
- Badge Verified Message: Enter the text of the email message. A preview will show on the right side of the screen.
- Click "Done" when you are finished, unless you wish to create customer data entry fields in the Custom Fields section.
- Repeat steps 3 - 5 for each badge type. You can click "Copy" next to a badge type to copy a badge type setup. This allows you to change specific fields without having to create everything from scratch each time. You will always have to choose the Convention Days on copied badges.
- Click "Delete" for badge types you no longer with to use.

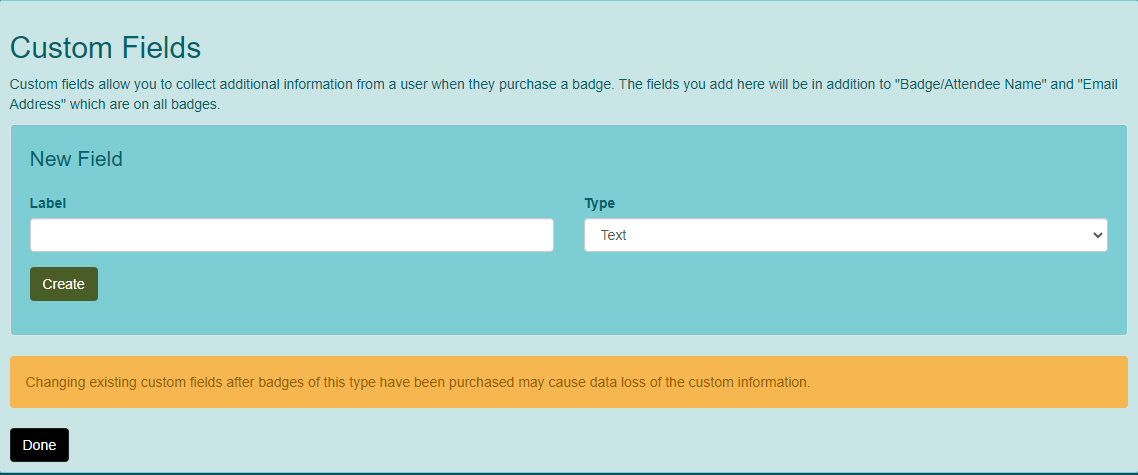
Custom Fields
- In the New Field section, enter a Label for the field and determine what Type of data will be entered into the field. Click "Create".
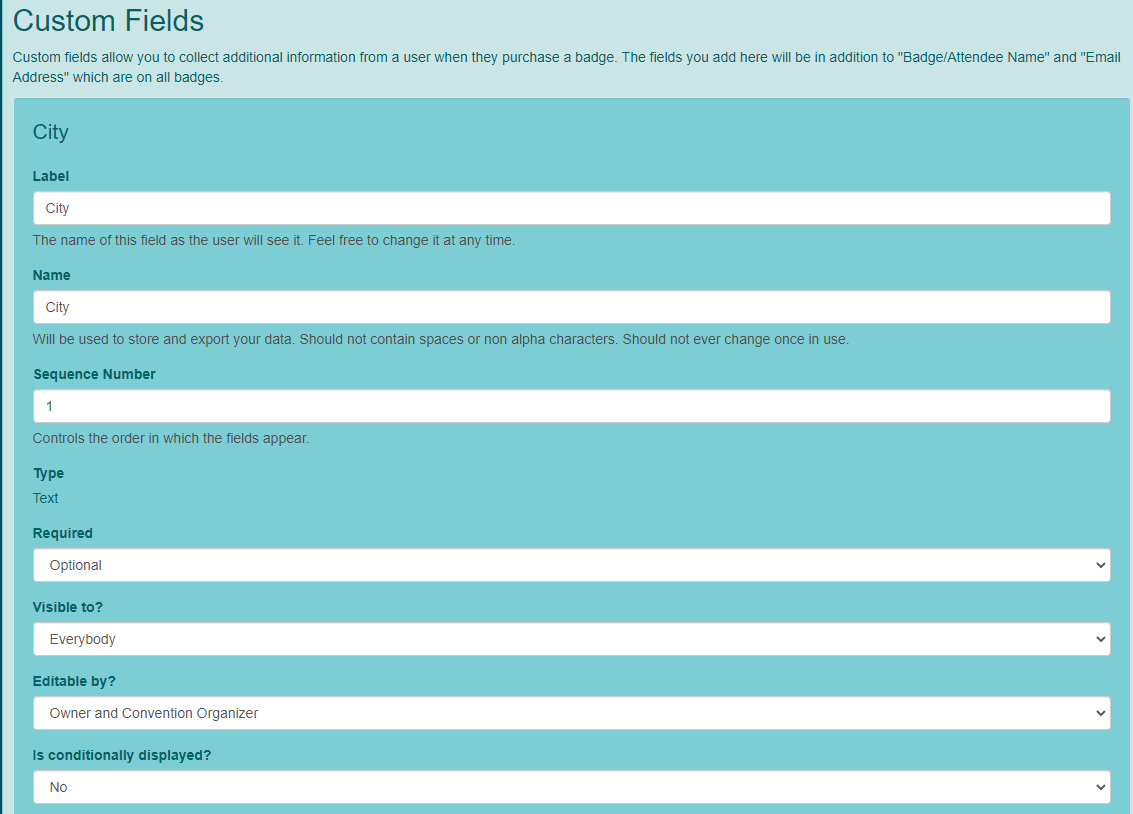
- Label: This is how the field will appear to the attendee when they are purchasing the badge.
- Name: This is used by the database to store and export your data. This field should contain no spaces or non-alpha characters. Once this is set, it should never be changed.
- Sequence Number: If you have multiple custom fields, this will determine the order they appear to the attendee.
- Type: This is the type of data that will exist in this field. It cannot be changed once the custom field is created.
- Text: Contains letters, numbers and a limited set of punctuation characters. Maximum 255 characters.
- Long Text: Allows more characters in the data entry.
- Hyperlink: Allows a link to another web location.
- Dropdown List: Allows the organizer to define a list that the attendee will be forced to choose from. In the Drop Down List field, you will enter your list with one selectable option per row.
- Agree to Terms: Allows the organizer to have a link to a terms document. The attendee will have to check a box to agree.
- Required: Determine if the field is required or not for badge purchase.
- Visible to?: Everybody allows all attendees to see the information in this field. Owner and Convention Organizer allows the badge holder and you to see the information in this field. Convention Organizers allows only you to see the information in this field.
- Editable by?: If you are allowing badge editing, determine who can edit this field. Owner and Convention Organizer allows the badge holder and you to edit. Convention Organizers allows only you to edit.
- Is conditionally displayed?: Determine if this field will only be displayed based on the contents of another field. If you select yes, you will be able to set the Conditional Field and Conditional Value.
- Repeat as needed.
- Click "Done" when you are finished.
Setup Discount Codes (optional)
Discount codes are available for badges. You might want to set up an early bird discount or use them to comp your staff badges. Refer to Activate / Manage Discount Codes for additional information.
Open Badge Sales
- Click on Open Badge Sales or go to Convention Tools > Registration > Settings.
- This will display the Registration Settings screen.
- Click "Open Badge Sales".
- A system message will appear.
-

- Click "OK".
- Badge sales are now open. You can Suspend Badge Sales or Close Badge Sales, but remember that once closed, they cannot be reopened.


Import Badge Type Categories and Badge Types
- If you have created a previous convention and wish to import your badge type categories and badge types from that convention, go to Convention Tools > Registration > Badge Types.
- Click on "Import' in the Create A Badge Type section.
- This will display the Import Badges From Another Convention screen.
- Choose a Convention To Import From in the drop-down menu.
- Click "Import Badge Types From Convention".
- Badge type categories and badge types will be imported.
- You will have to "Edit" each badge type to choose Convention Days for each.
Return to Badge Type Categories
Return to Badge Types
Free Badge Configuration
The use of TTE for your convention is paid for through the convenience fees assigned to purchases made through the system. Therefore badges for attendees must have a minimum cost of $2.00. There are a few times when a convention might want to offer free badges for a group of people. Free badges fall into two distinct categories: Convention Support Personnel and Convention Attendees. Convention Support Personnel include staff, volunteers, special guests, etc. TTE will allow you to create free badge for this category through the discount system. If you wish to make your convention completely free for attendees, you must purchase a number of Free Attendee Badges through our Supply module. Instructions for both these situations are included below.
Convention Support Personnel
- Go to Convention Tools > Registration > Badge Types.
- Create a badge type for the convention support personnel.
- Go to Convention Tools > Financials > Discounts.
- Create a discount for the convention support personnel with the following settings:
- Public = Private
- Discount by = Percent of Item
- Discount Percent = 100
- Badge Type = the badge type you created in step 2.
- Send an email to your convention support personnel with a link to the badge type. Include the discount code so they can buy a free badge.
Convention Attendees
- Go to Convention Tools > Registration > Badge Types.
- Create a badge type for a convention attendee.
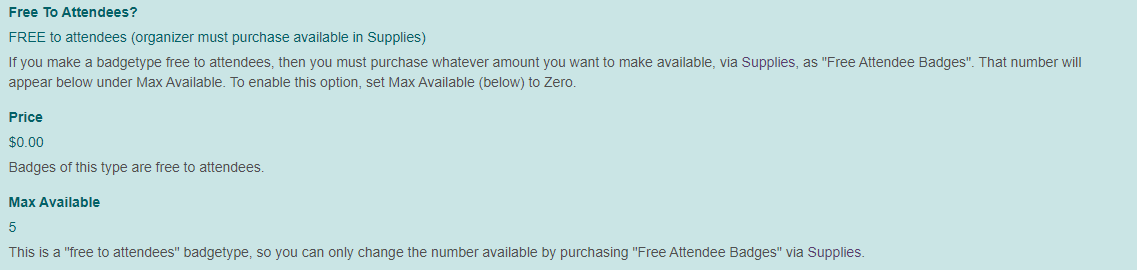
- Set the Max Available to 0.
- Free to Attendees? will have a drop-down menu. Set this to FREE to attendees (organizers must purchase available in Supplies). Max Available is no longer editable.
- Complete the badge type creation.
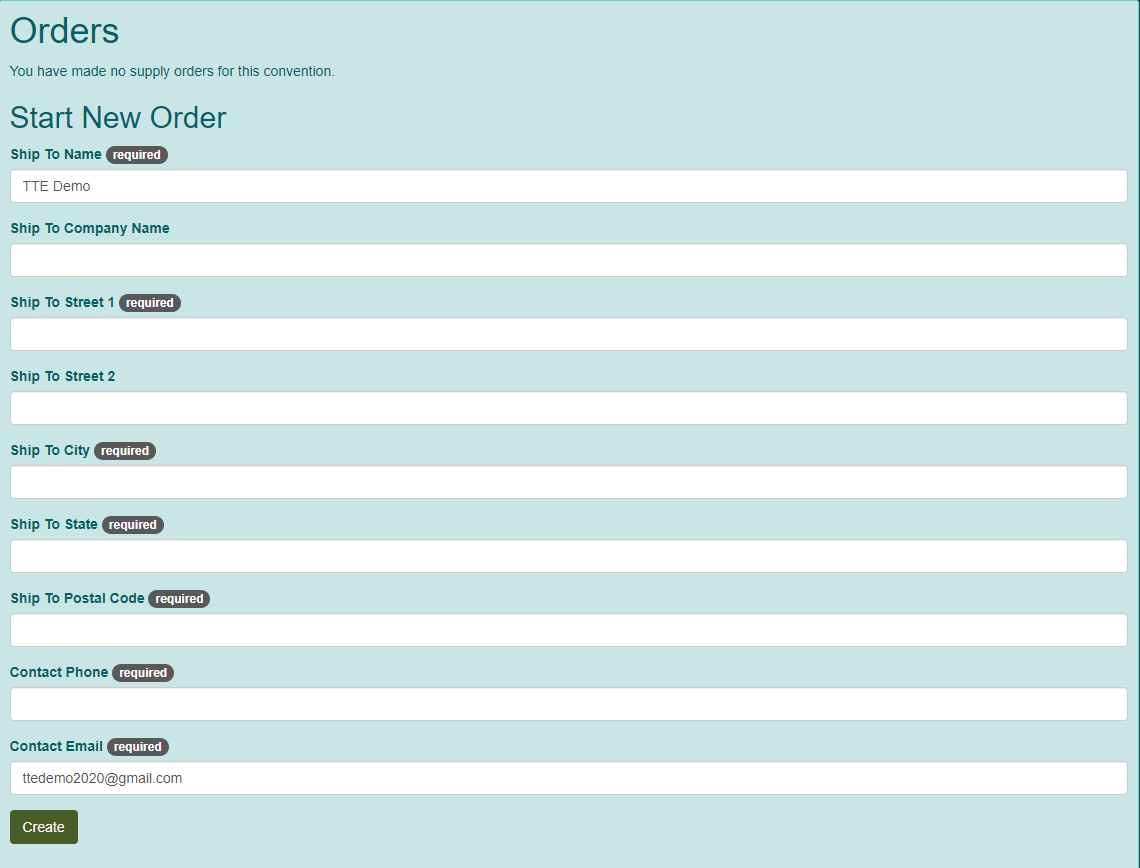
- Go to Convention Tools > Supplies > Place an Order.
- This will display the Orders screen.
- Ship To Name: Your name
- Ship To Company Name: The name of your convention
- Ship To Street 1: The shipping address
- Ship To Street 2: The second line of the shipping address
- Ship To City: The shipping city
- Ship To State: The shipping state
- Ship To Postal Code: The shipping postal code
- Contact Phone: Your phone number in case there are questions regarding your order
- Contact Email: Your email to send shipping information.
- Click "Create" when you are finished.
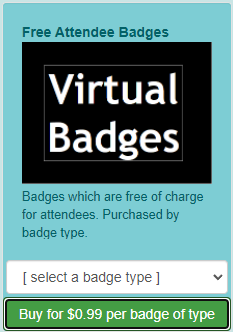
- The Supplies available for purchase section will appear at the bottom of the screen.
- Locate the Free Attendee Badges and select the badge type you just created.
- Click "Buy for $0.99 per badge of type".
- The Items in Order section will now show the Free Attendee Badges for the badge type. The system defaults to provide you 5 at $0.99. You can change the quantity as necessary or click "Remove" to remove the item completely.
- When you have all your Free Attendee Badges purchased, click "Checkout" and complete the payment information.
- If you go to Convention Tools > Registration > Badge Types and click on "Edit" next to the badge type, you will see the available badges listed.

Return to Badge Type
Tutorial
Warning! Tutorials may be slightly out of date with current code.