
Create an In-Person Convention
onventions can be created in Tabletop.Events with no fees associated. It is not until the convention begins selling items that fees are assessed. This is important because you can create a convention and experiment with features before committing to the creation of your convention.
- Getting Started
- Create Convention Checklist
- Configure Convention Settings
- Convention Dates
- Edit Venue
- Contact Information
- Financial Settings
- Set Look and Feel
- Create Front Page Content
- Setup Bank Information
- List Event Publicly!
- Additional Checklists
- Tutorials
Getting Started
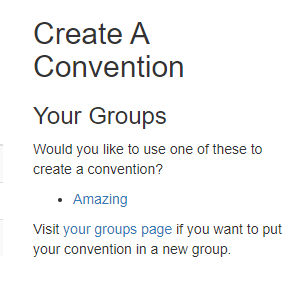
You must have a Tabletop.Events (TTE) account in order to create a convention. You can find instructions on Creating an Account here. You must be a member of a group to create a convention. You can find instructions on Creating a Group here.
- Navigate to the Tabletop.Events website, then click on Conventions in the top left portion of the page next to the TTE logo.
- Under the Create a Convention section, choose the group you are using in the creation of this convention.
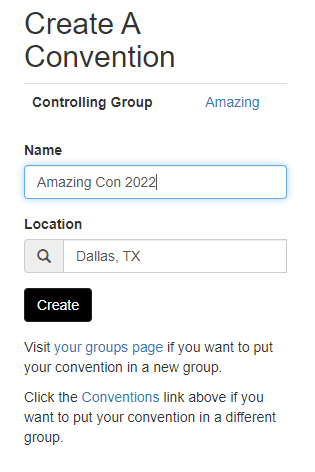
- The page will refresh and the Create a Convention section will now allow you to enter a Name and Location. When you type in a city and state, the system will prompt you to choose a city/state combination that already matches one in the system or create a new city. Note: The location you enter will determine the time zone of all convention and event times. You will not be able to change the location after the convention has been created.
- Click "Create".
- The new home page for your convention will be displayed. The Checklist section is viewable by convention organizers only.
Create Convention Checklist
This section of the documentation will guide you through the Create Convention Checklist and will provide directions to access each screen from the Convention Tools menu.
Configure Convention Settings
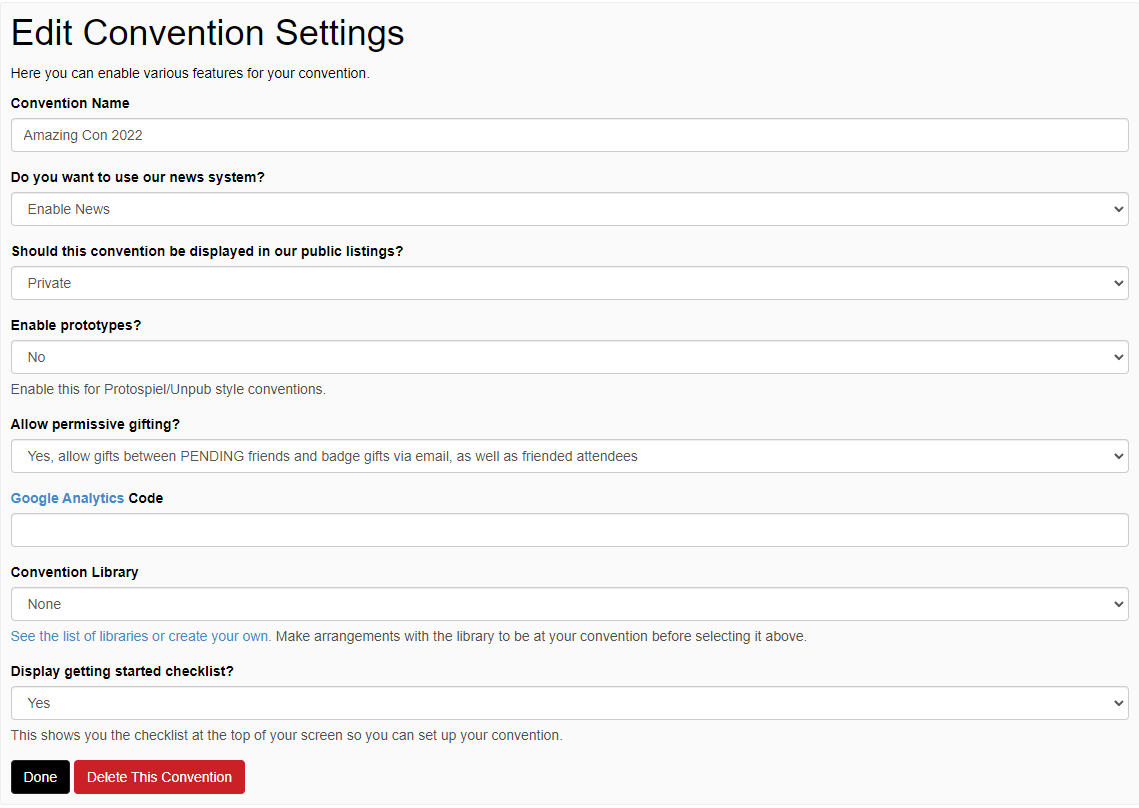
- Click on Configure Convention Settings or go to Convention Tools > Convention Setup > Settings.
- This will display the Edit Convention Settings screen.
- This will show you the global settings available for your convention.
- Convention Name: This is the name you established previously for your convention.
- Do you want to use our News System?: TTE allows you to create News Updates for your convention. News Updates can be emailed to all, some or no convention attendees. News Updates will also appear on your convention's home page under the News menu.
- Should this convention be displayed in our public settings?: Private conventions are not searchable by visitors to TTE and are only viewable by Leaders and Directors of your group. Your convention will remain private until you have setup the financial data for processing transactions. Public conventions are searchable by visitors to TTE.
- Enable prototypes?: This allows you to add the Prototypes menu to your homepage, and allows attendees to register, vote on and leave feedback for prototypes at your convention. Submit / View Prototypes for Convention documentation may help to further clarify this setting.
- Allow permissive gifting?: This field helps you determine how badges can be purchased for your convention. Purchase Convention Badge documentation may help to further clarify this setting.
- No, allow gifts ONLY between attendees with ACCEPTED friendships: When a TTE account buys a badge for your convention, they will be able to buy badges that are linked to their TTE account and to a TTE account that is listed as their friend in the system.
- Yes, allows gifts between PENDING friends and badge gifts via email, as well as friended attendees: When a TTE account buys a badge for your convention, they will be able to buy badges that are linked to their TTE account, linked to a TTE account listed as their friend in the system AND to any person for whom they enter an email.
- Google Analytics Code: If your organization uses Google Analytics to track your user's web traffic patterns, you enter the GA code here.
- Convention Library: This allows you to link a Game Library created in TTE to your convention. This allows check ins and check outs using badge information and a link for attendees to view the Game Library from your home page.
- Display getting started checklist?: You can turn on or off the checklist at the top of the organizer view.
- Enter each setting for your convention and click "Done".
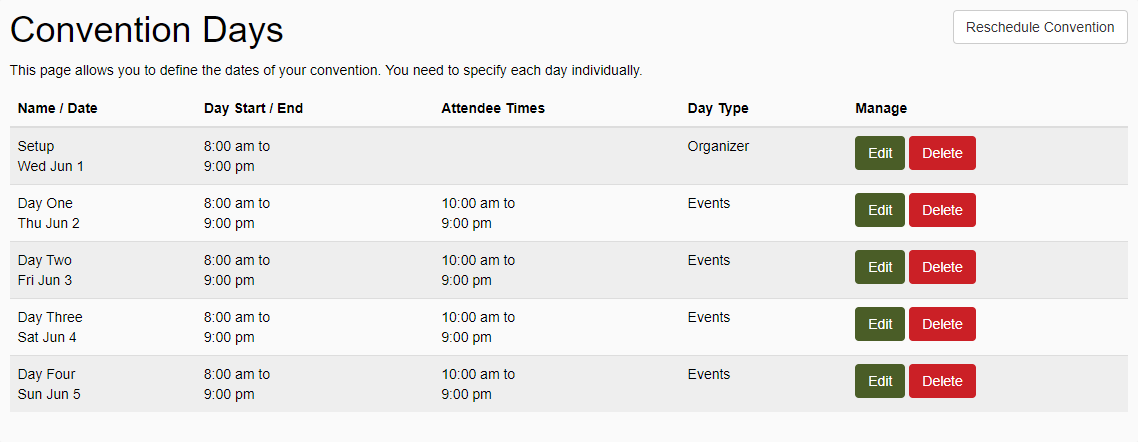
Convention Dates
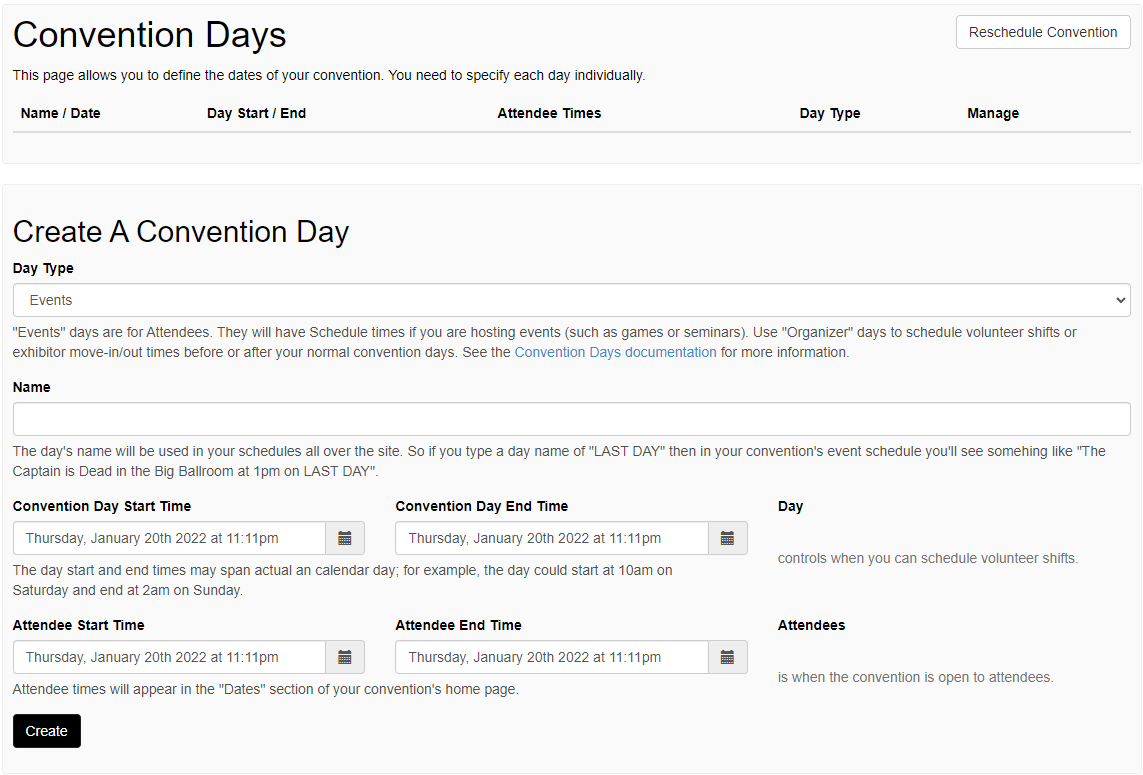
- Click on Convention Dates or go to Convention Tools > Convention Setup > Dates.
- This will display the Convention Days screen.
- Under the Create a Convention Day section, you will set the setup and attendee days for your convention.
- Day Type: Organizer days are for setup and/or tear down only. They will be used when setting up volunteer shifts; however, they will not be displayed as dates on your convention home page. Events days are the official days for your convention. They are displayed on the convention home page.
- Name: This is the name for the day that will be used throughout your convention to describe events, volunteer shifts, etc. on that day.
- Convention Day Start / End Time: These are the times your convention is open to volunteer shifts each day. All other dates created in the system must fit within the start and end times determined here. On event days, these typically extend 30 minutes to an hour beyond your attendee times. Note: If you are a 24 hour convention, you should set these days from the start of your convention until the same time the following day.
- Attendee Day Start / End Time: These are the times your convention is open to attendees each day. These times will be displayed on your home page. Note: If you are a 24 hour convention, you should set these days from your some time early in the morning before things get rolling until the same time the following day. This will not be shown when creating organizer days.
- Click "Create" when you are finished.
- Repeat steps 3 - 4 for each day of your convention.
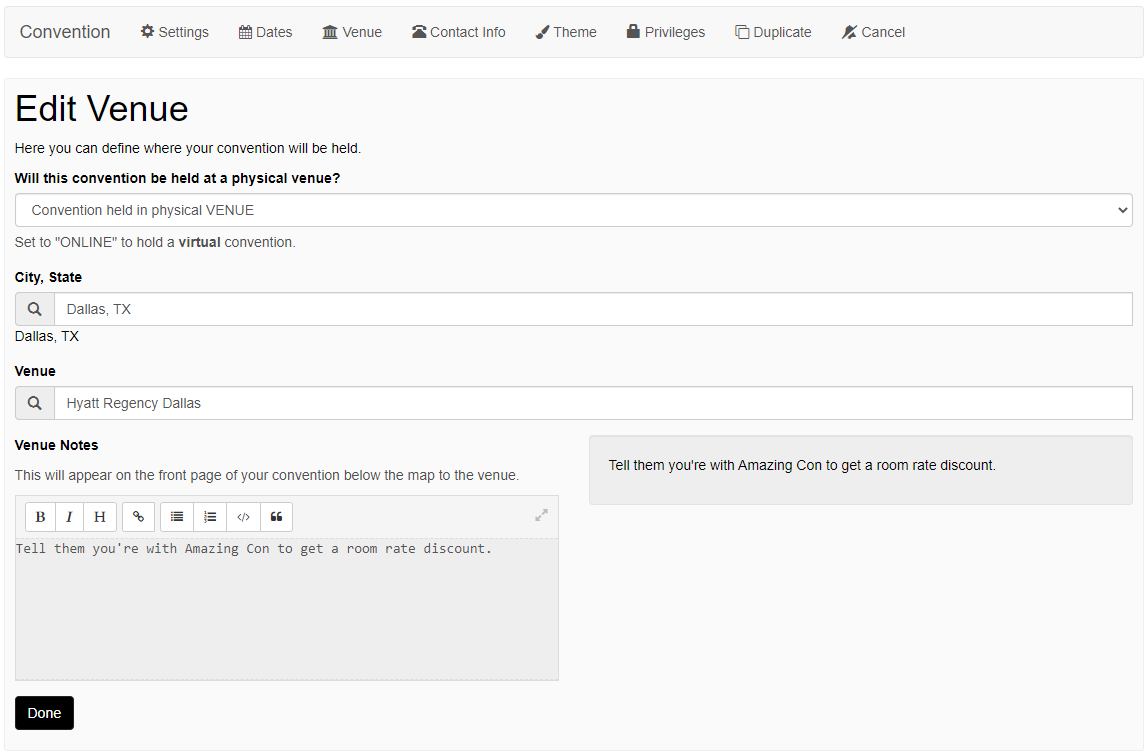
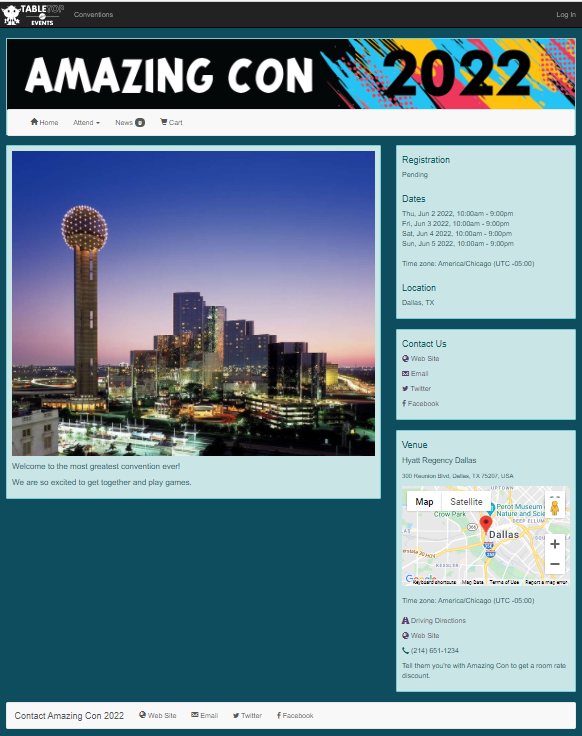
Edit Venue
- Click on Edit Venue or go to Convention Tools > Convention Setup > Venue.
- This will display the Edit Venue screen. This document refers to creating a convention that occurs at a physical location. (Creating a virtual convention).
- Will this convention be held at a physical venue?: This allows you to set your convention for in person or virtual.
- City, State: This was set when you first created your convention. This cannot be changed.
- Venue: Enter the actual location name of the venue. Your convention home page will include a Google Map with your location and the ability to get driving directions.
- Venue Notes: Enter any notes that you wish to pass along to the convention attendees. This will appear at the bottom of the Venue section on the home page.
- Click "Done" when you are finished.
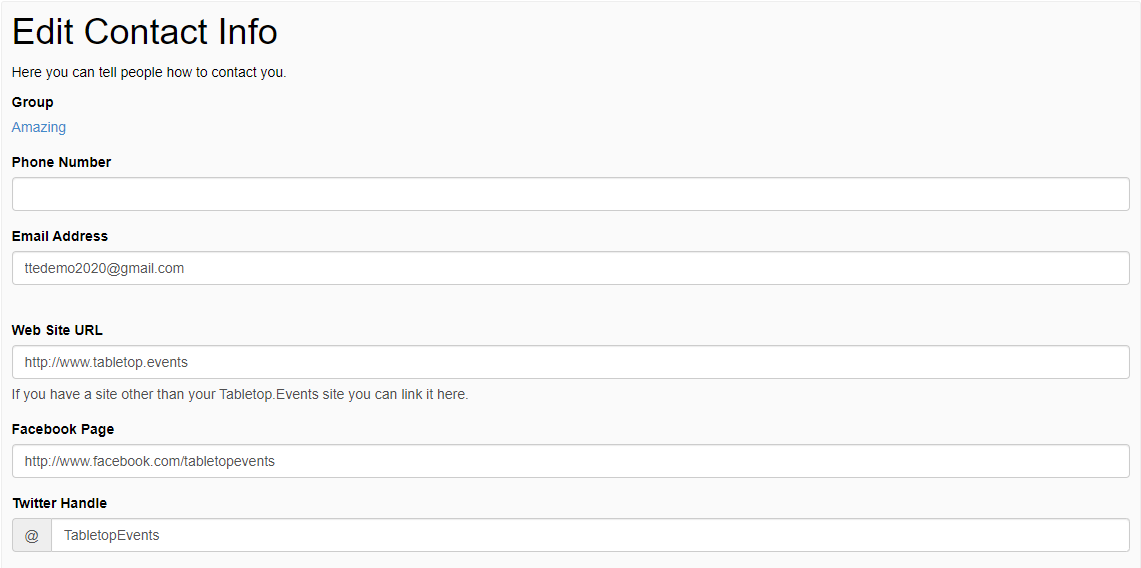
Contact Information
- Click on Contact Information or go to Convention Tools > Convention Setup > Contact.
- This will display the Edit Contact Info screen.
- Group: This is the group who owns this convention. This cannot be changed.
- Phone Number: Set a phone number where convention attendees may contact you. This is NOT required. This will appear at the bottom of your convention pages.
- Email Address: Enter the email address for the convention. This will appear at the bottom of your convention pages and will be used as the "Reply To" address for all email messages TTE sends on your behalf regarding the convention. Once you open Convention Badge Sales, you can edit, but not remove, the convention contact email address.
- Website URL: If you have another main website for the convention, enter it here. This will appear at the bottom of your convention pages.
- Facebook Page: If you have a Facebook page for your convention, enter it here. A Facebook link will appear at the bottom of you convention pages and will direct your attendees to your page.
- Twitter Handle: If you have a Twitter account for your convention, enter it here. A Twitter link will appear at the bottom of you convention pages and will direct your attendees to your channel.
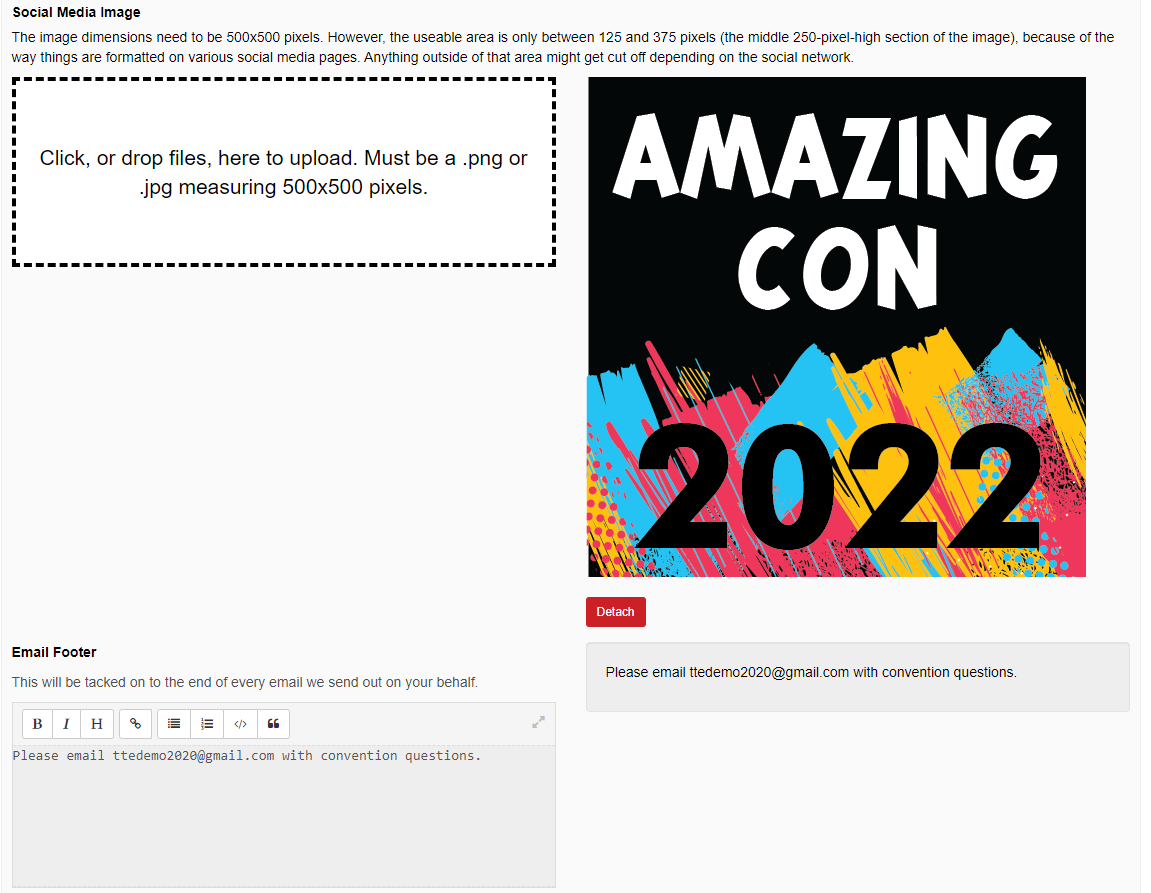
- Social Media Image: When you link to your TTE convention page from social media, a default Tabletop.Events logo is the image shown for the link. If you would like to have a custom image for your convention appear, create a file and upload it here. The file must be a .png or .jpg measuring exactly 500 x 500 pixels.
- Email Footer: If you would like a custom footer applied to the end of all email messages TTE sends on your behalf regarding the convention, you can enter it here. This will appear above our footer which is shown here:
- Click "Done" when you are finished.


Financial Settings
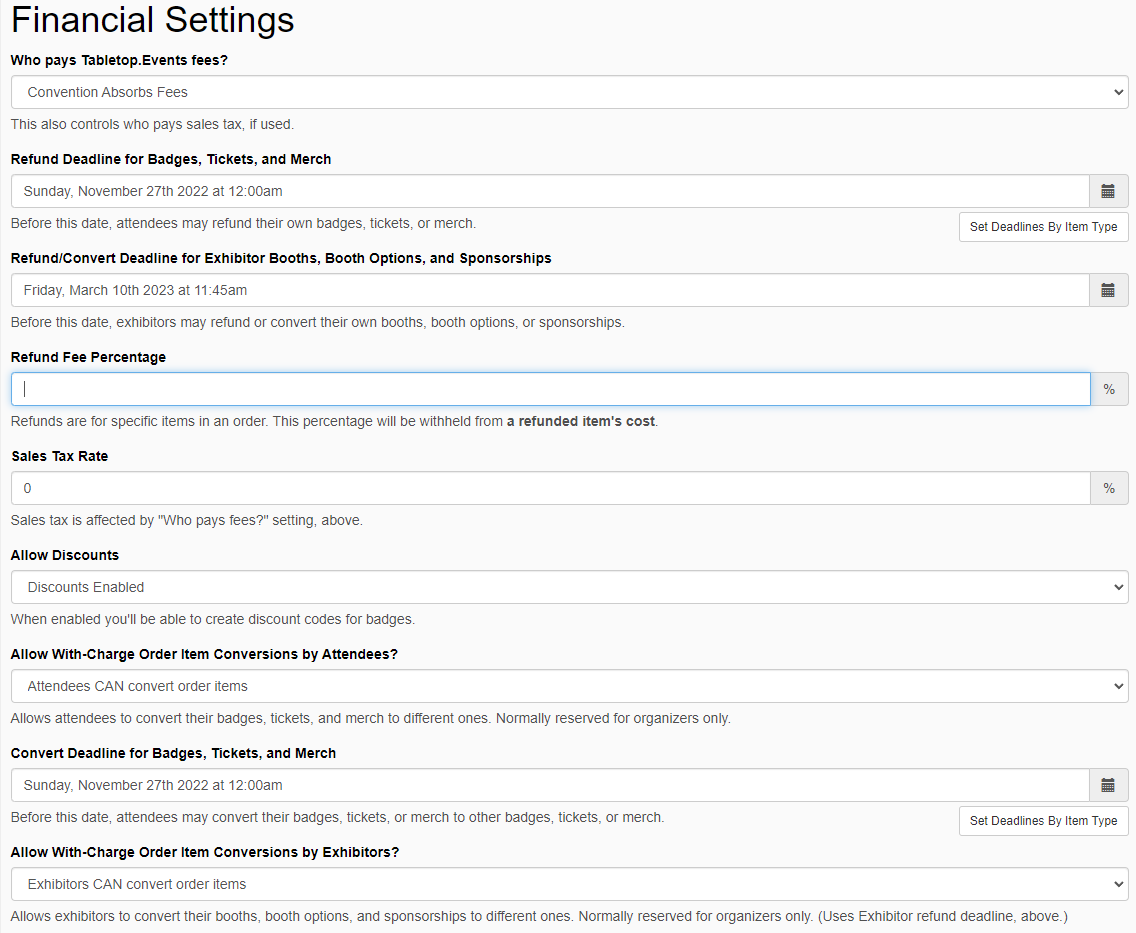
- Click on Financial Settings or go to Convention Tools > Financials > Settings.
- This will display the Financial Settings screen.
- Who pays Tabletop.Events fees?: You can choose who will pay the TTE convenience and Stripe fees for your transactions. Remember that cash transactions are not charged any fees.
- Convention Absorbs Fees: With this option, you set a price for badges, tickets, etc. That is all that is paid by your attendees. TTE and Stripe fees will be paid by you from the total you collected from your attendee.
- Pass Along Fees to Customer: With this option, you set a price for badges, tickets, etc. When your attendees checkout, they will pay the TTE and Stripe fees in addition to the item prices.
- Refund Deadline for Badges, Tickets, and Merch: Set the last day that an attendee can process a refund themselves through the TTE system. After that date, convention organizers can still process refunds until the end of the convention. If you would like different dates for each sales item type, click "Set Deadlines by Item Type". You will now have three refund deadlines available.
- Refund/Convert Deadline for Exhibitor Booths, Booth Options, and Sponsorships: Set the last day that an exhibitor or sponsor can process a refund themselves through the TTE system. After that date, convention organizers can still process refunds until the end of the convention.
- Refund Fee Percentage: When a refund is processed, do you wish to hold back a percentage of the refund to cover administrative costs. This field is a percentage and can be set from 0 - 50. If this field is >0, you then can choose:
- Apply Refund To: There are six types of purchases available through TTE. You can choose which items will have a Refund Fee withheld.
- Sales Tax Rate: You can set the sales tax rate for your area. If attendees are paying fees, this will be added to their total. If the convention is absorbing fees, TTE will track the sales tax in the Financial Record. When you set a rate for this field, you can determine which of the six types of purchases to which the sales tax should be applied.
- Allow Discounts: Enabling discounts allows you to set early bird discounts and have free or discounted badges for staff, GMs, volunteers, etc. Setting up Discounts is discussed in the Activate Registration Module (Badges), Activate Schedule Module (Events / Tickets), Activate Merch Module and Activate Exhibitors / Sponsors Module documentation.
- Allow With-Charge Order Item Conversions by Attendees?: If you would like to allow attendees to convert like items to like items and pay the difference in cost, enable this option. This would allow for an attendee to do things like convert their badge to a VIP badge and pay the difference in price.
- Convert Deadline for Badges, Tickets, and Merch: Set the last day that an attendee can process a conversion themselves through the TTE system. After that date, convention organizers can still process conversions until the end of the convention. If you would like different dates for each sales item type, click "Set Deadlines by Item Type". You will now have three conversion deadlines available.
- Allow With-Charge Order Item Conversions by Exhibitors?: If you would like to allow exhibitors and sponsors to convert like items to like items and pay the difference in cost, enable this option. This would allow an exhibitor to convert their booth from standard to corner and pay the different in price. The deadline for this was set in Refund/Convert Deadline for Exhibitor Booths, Booth Options, and Sponsorships.
- Click "Done" when you are finished.
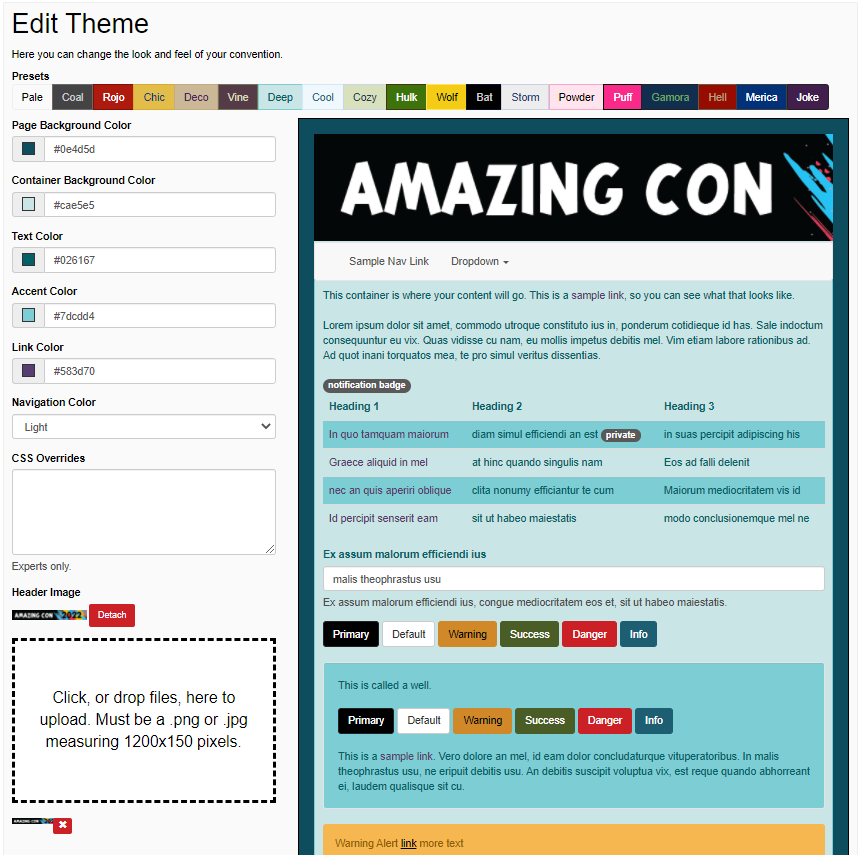
Set Look and Feel
- Click on Set Look and Feel or go to Convention Tools > Convention Setup > Theme.
- This will display the Edit Theme screen.
- There are several preset themes available to choose from. Alternatively, you can set specific colors for the various types of items on the convention pages.
- Header Image: If you wish to replace the name of your convention with an image, this is where you upload that image. This image will also be used as the header for emails TTE sends on your behalf. The file must be a .png or .jpg measuring 1200 x 500 pixels.
- Click "Done" when you are finished.
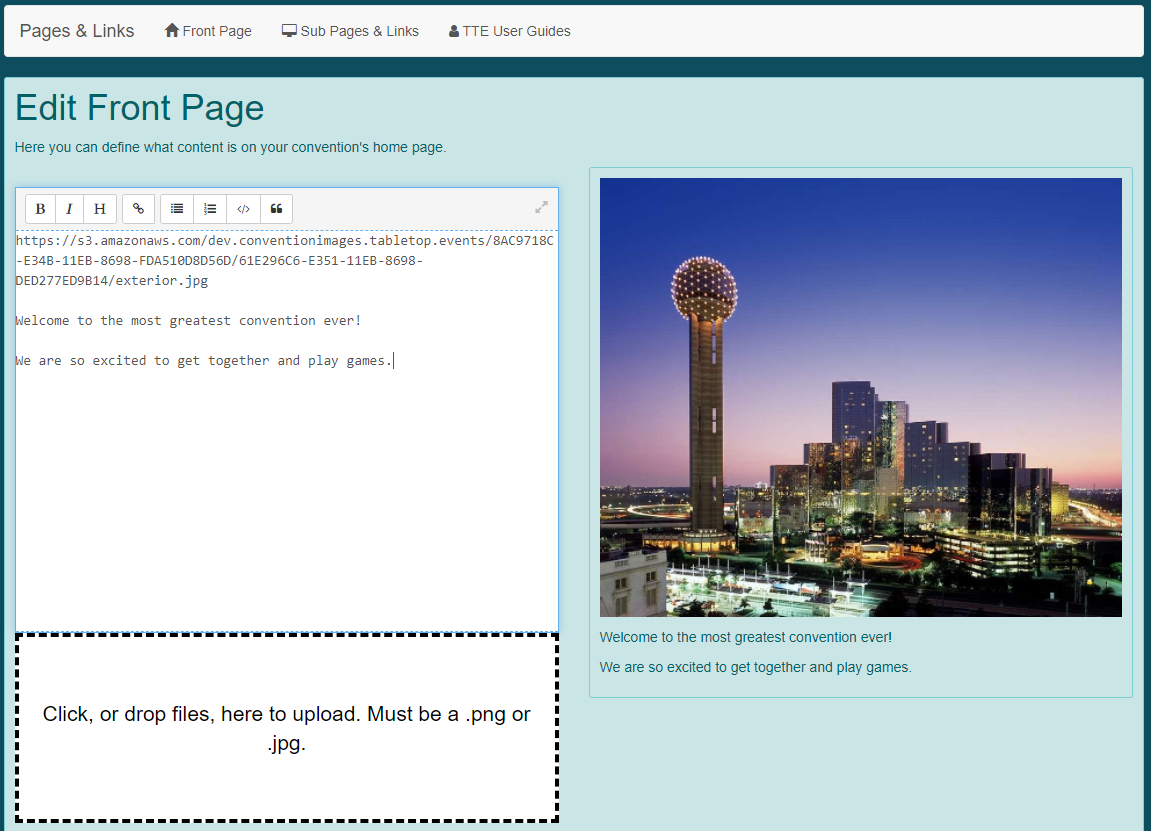
Create Front Page Content
- Click on Front Page Content or go to Convention Tools > Pages & Links > Front Page.
- This will display the Edit Front Page screen.
- Here you can enter your front page information for the convention. Images can be used within the content, and formatting options are listed under the text box. A preview of your home page content will show on the right side of the screen.
- Click "Done" when you are finished.
Setup Bank Information
Go here for more information about setting up. Stripe
List Event Publicly!
- Click on List Event Publicly or go to Convention Tools > Convention Setup > Settings.
- Set the Should this convention be displayed in our public settings? to Public.
At this point, your convention is ready to be listed publicly. However, many conventions wait until they have completed one or all of the checklists in the next section.
Additional Checklists
- Activate Registration Module (Badges)
- Activate Scheduling Module (Events / Tickets)
- Activate Exhibitors / Sponsors Module
- Activate Volunteers Module
Tutorial
Warning! Tutorials may be slightly out of date with current code.